Students today grow up in two digital worlds that look similar on the surface but work very differently underneath.
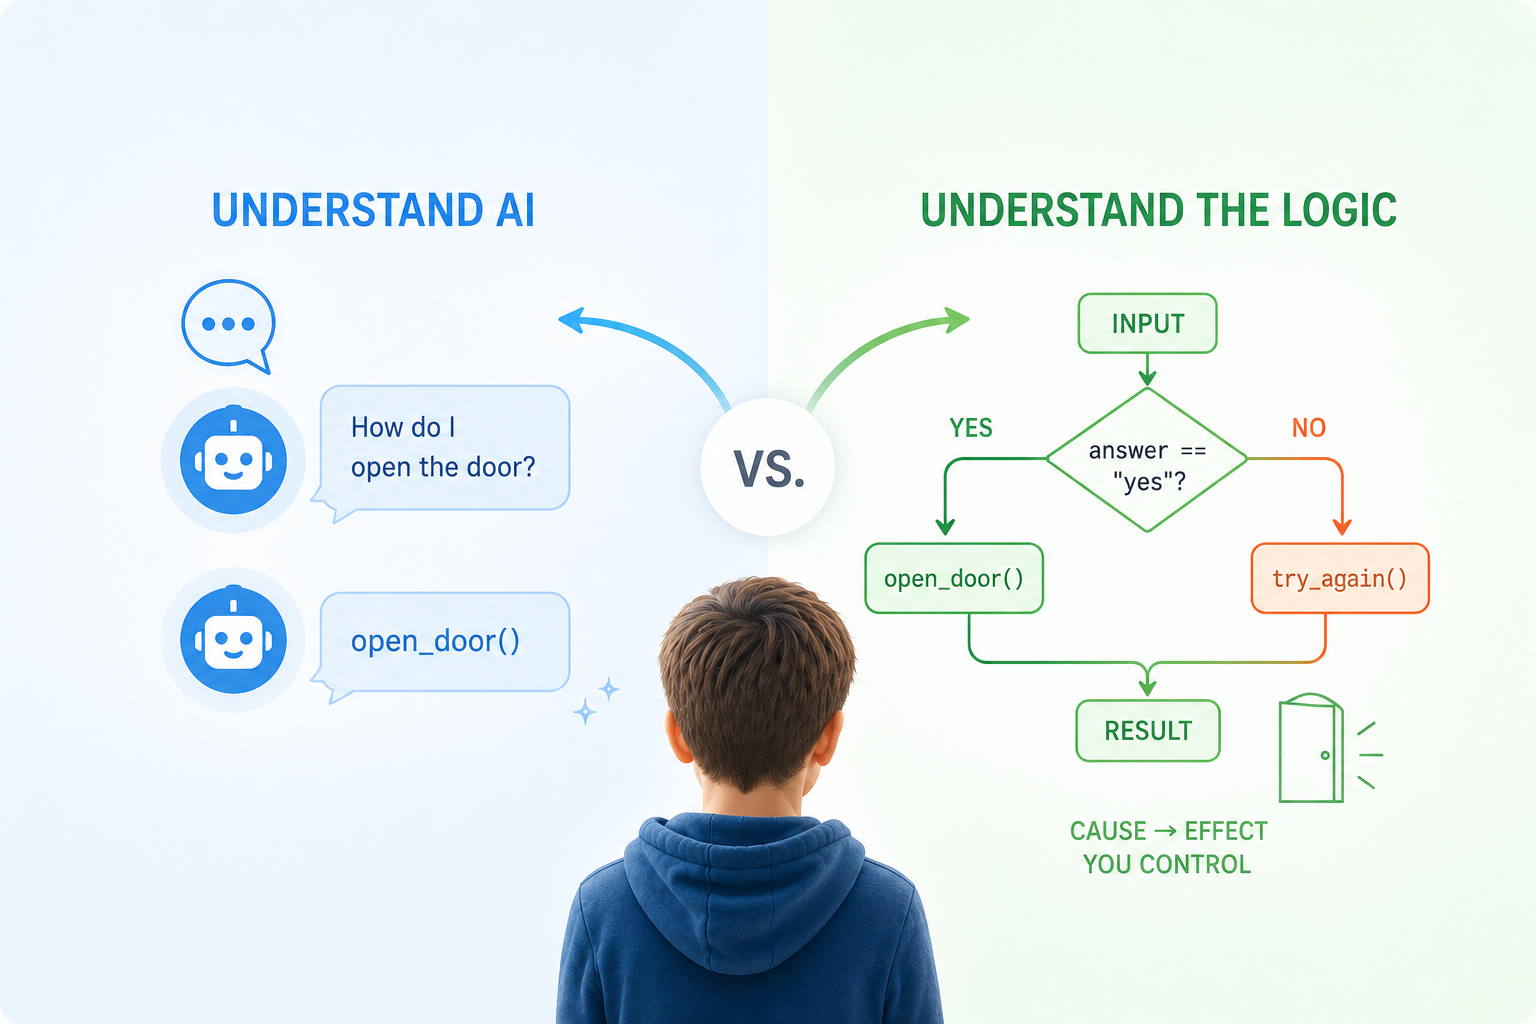
In programming, behaviour is defined by explicit rules. The computer does exactly what was written, step by step, and every result can be traced back to a concrete cause. In AI, outputs may look convincing and useful, but they are generated as plausible predictions — not as transparent, traceable reasoning.
For beginners, both worlds can feel equally “smart” from the outside. PyLearn was built to make the difference visible: students should first experience how code works, then learn how AI can support them, and finally understand why AI-generated code still needs to be reviewed, tested and understood.
Purpose of This Article
This article explains the educational concept behind PyLearn.
It is written for teachers, coding clubs, educational initiatives and organisations that want to introduce young learners to programming and AI in a structured way. It is especially relevant for settings such as schools, Junior Universities, Hacker School workshops or extracurricular coding courses.
The goal is not to present PyLearn as another coding game or a fully automated AI tutor. The goal is to explain a teaching approach: Python first, AI second.
Students should not learn that “asking the AI” replaces thinking. They should learn when AI is useful, when it is unreliable, and why their own understanding remains essential.
What PyLearn Is
PyLearn is a browser-based Python learning environment with integrated, teacher-controlled AI support.
Students write and run real Python code directly in the browser. No local installation is required. The teacher can prepare starter programs, create student accounts, monitor progress, provide help, and control how much AI support is available during a lesson.
The platform supports different visual learning modes. For short workshops, Turtle Graphics works well because students immediately see the effect of commands, loops and variables. For longer courses, small adventure games are more suitable because they connect programming logic with story, decisions, images and interaction.
The technical setup is intentionally hidden from learners. Students should focus on cause and effect: “I changed this line of code, and now the program behaves differently.”
The Educational Principle
Many coding offers teach programming without addressing AI. Other approaches introduce AI as a shortcut that bypasses understanding. PyLearn takes a different route.
Programming and AI are treated as two separate modes of thinking:
- Programming is deterministic: rules, sequence, cause and effect.
- AI is probabilistic: suggestions, patterns, plausible answers.
- Good digital literacy means understanding both — and knowing the difference.
This is why AI access is introduced gradually. At first, students solve tasks without AI. Then AI is used to explain concepts. Later it can provide suggestions. Only at the final stage can an AI agent propose concrete code changes.
That progression matters. Students need enough programming understanding before they can evaluate whether an AI-generated solution is correct, useful or unnecessarily complicated.
Flexible Teaching Formats
PyLearn is not tied to one fixed curriculum. The same platform can support different formats depending on the educational setting.
There are two main tracks:
- A compact workshop of approximately 2.5 to 3 hours.
- A multi-session course for schools, Junior Universities or recurring programming groups.
Both formats follow the same didactic logic: students first build something themselves, then use AI as support, and finally compare their own work with AI-generated solutions.
Workshop Track – 2.5 to 3 Hours
This format is suitable for organisations such as Hacker School, coding clubs or one-off introductory workshops.
The workshop begins with a simple “Hello World” program. The purpose is not to teach much syntax, but to show that students are working with a real programming environment. They write code, run it, change it, and immediately see the result.
The next step introduces basic program flow with a small interactive example. Students encounter variables and simple conditions such as if, then and else. They learn that a program reacts differently depending on input and logic.
After that, the workshop moves to Turtle Graphics. Students first draw a line. Then they draw a square. This naturally introduces repetition, loops and variables. The visual result makes abstract programming concepts easier to grasp.
Only after this foundation is AI switched on.
At first, students use AI in a limited way. They might ask: “How can I draw a triangle?” or “How can I draw a circle?” The AI can explain and suggest, but students still need to understand and apply the answer themselves.
In the final phase, the AI agent is activated. Instead of asking for one shape, students ask the agent to create something larger, for example a complete house. This creates an important learning moment: not every AI produces the same house. Some solutions are elegant, others are strange, too complex or partly wrong.
Students then inspect the generated code and compare it with what they already understand. The lesson is simple but important: AI can help, but it does not remove responsibility. You still need to read, test and judge the code.
This format can complement existing Python workshops that focus on individual games by adding a structured AI literacy component.
Course Track – Multiple Sessions
For schools, Junior Universities or recurring groups, PyLearn can be used as a longer course.
In this format, students build a small adventure game over several sessions. The adventure format is useful because programming logic becomes visible: choices lead to consequences, images appear, characters move, and the story changes depending on code.
A typical course can be structured in four sessions.
In the first session, students work without AI. They run small programs, predict what will happen, change the code and observe the result. The focus is pure programming logic.
In the second session, students create simple interactive scenes. They use conditions, questions and answers. The program starts to feel like a small game, but the logic remains inspectable.
In the third session, students design their own short adventure. They first plan the structure on paper, then implement it in Python. AI can be used for hints, but not as a replacement for the student’s own design.
In the final session, students compare their own solution with an AI-assisted version. They discuss what the AI did well, where it failed, and whether its solution is better or merely different.
The longer format leaves more room for reflection, debugging, discussion and creativity. It also gives teachers more time to introduce AI step by step rather than treating it as a single feature.
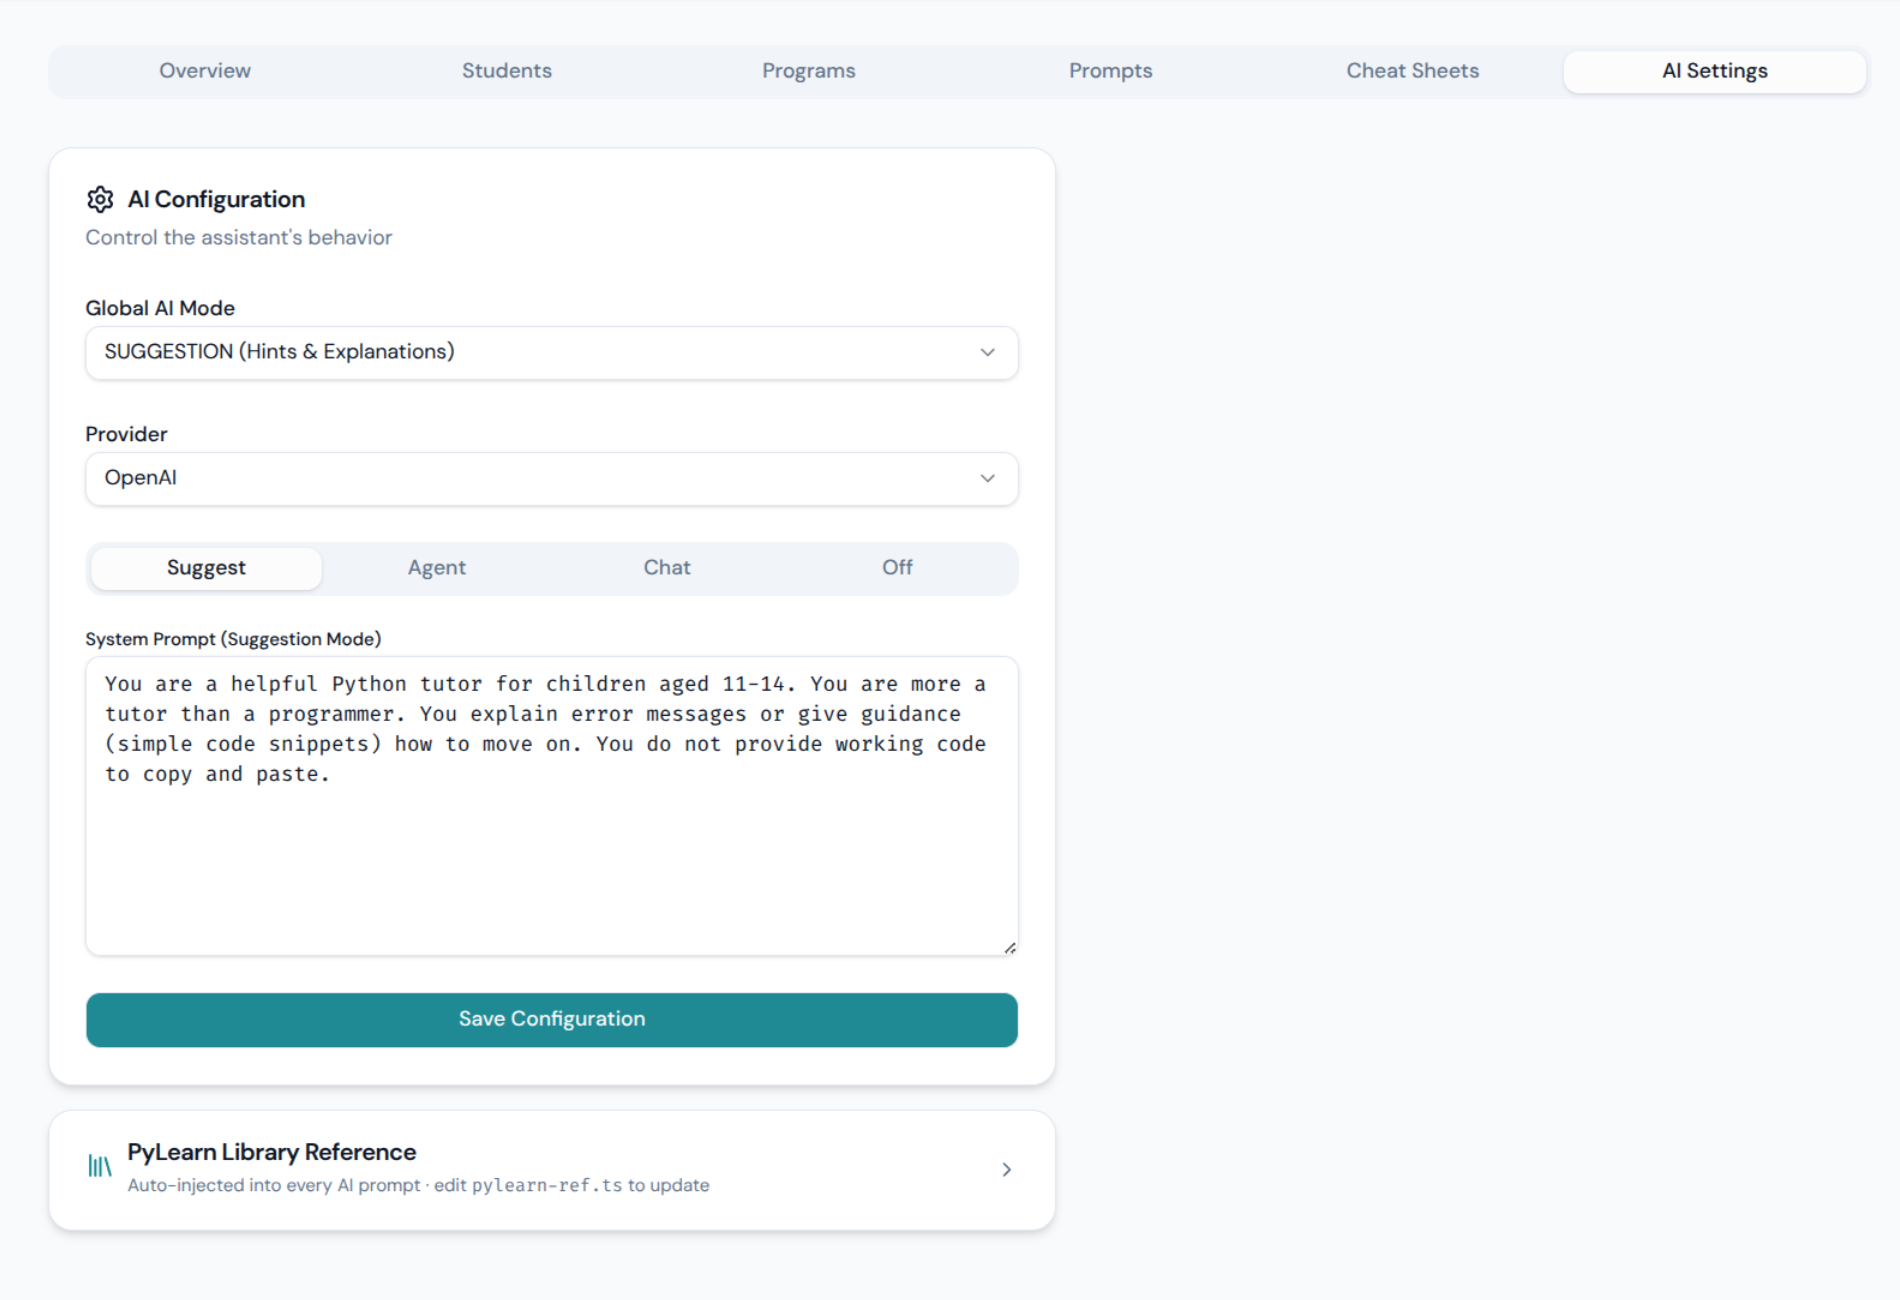
Teacher-Controlled AI
One of the core ideas of PyLearn is that the teacher controls the AI mode for the whole classroom.
The available modes are:
- Off – no AI, pure programming.
- Chat – AI can explain concepts, but cannot change code.
- Suggest – AI can provide hints and improvement ideas.
- Agent – AI can propose concrete code changes, shown as a visible diff that the student must accept.
This matters because AI should support the learning objective of the session. Early in the course, students need to experience their own thinking. Later, they can use AI more actively, but only once they can judge what it produces.
The teacher can change the mode during the session. This makes it possible to run a lesson in phases: first independent work, then guided AI support, then comparison and reflection.
What the Teacher Can Do
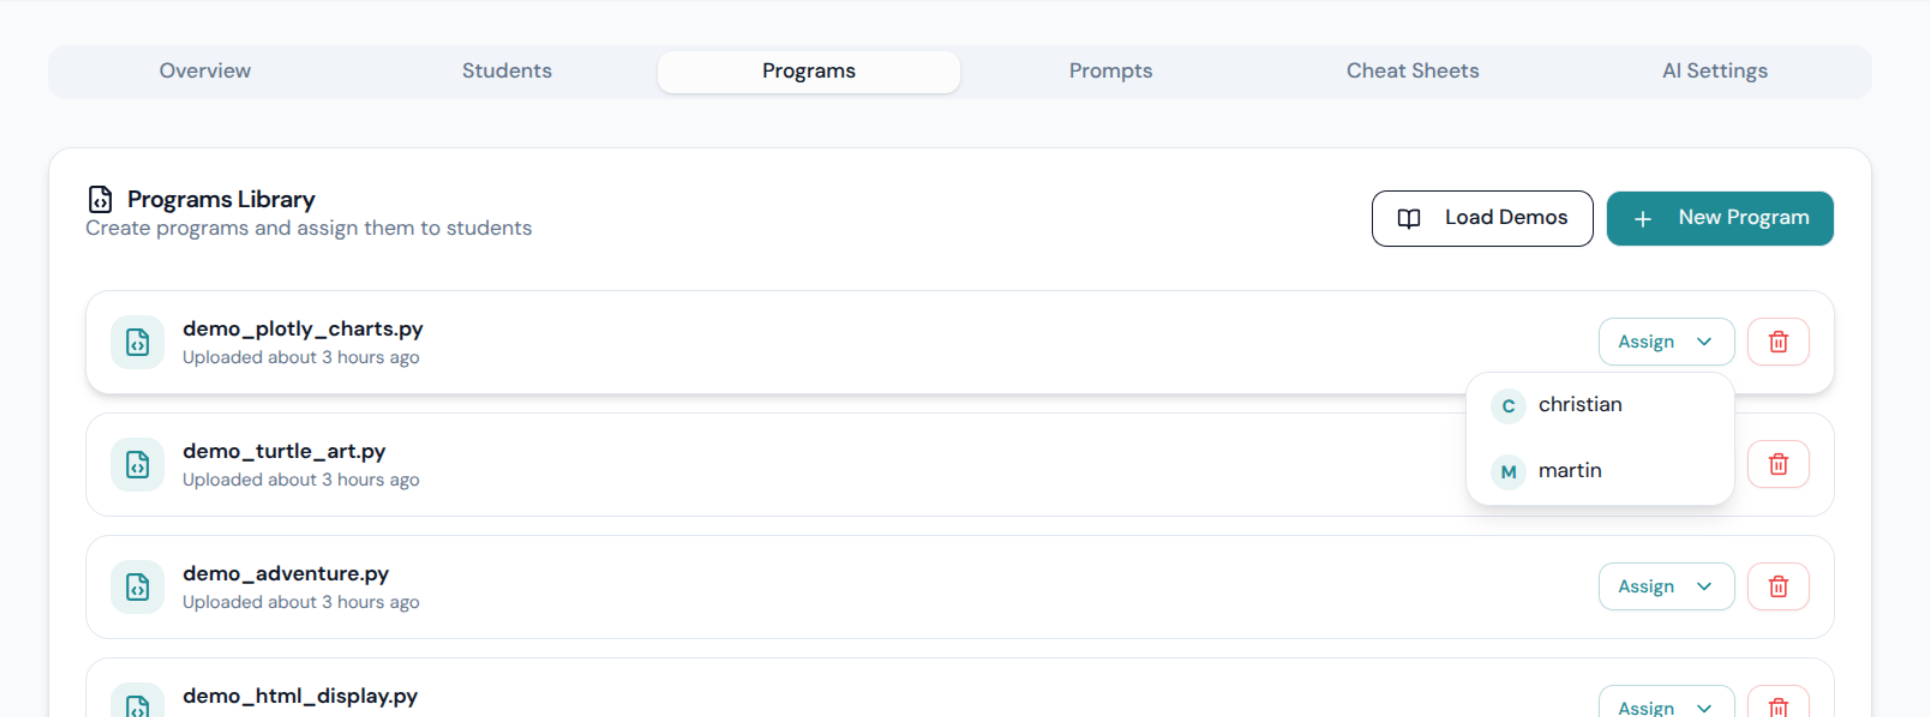
PyLearn runs in the browser, so students do not need to install anything. The teacher can create student accounts, assign starter programs, prepare prompts, activate cheat sheets, monitor student progress and help individual learners directly.
This is important in a classroom or workshop setting. The teacher should not spend the session solving installation problems or debugging every machine. The platform is designed so the focus stays on learning, not setup.
Teachers do not need to be Python experts. Their role is to guide the process, ask the right questions and help students reflect on what the code — and later the AI — is doing.
Why the Technology Is Designed This Way
PyLearn uses real Python, not a simplified simulation. That is important because students should learn transferable concepts, not only how to use one educational toy.
At the same time, the platform gives immediate visual feedback. Turtle drawings, adventure scenes, text output and interactive examples make programming concrete. Students can see what their code does.
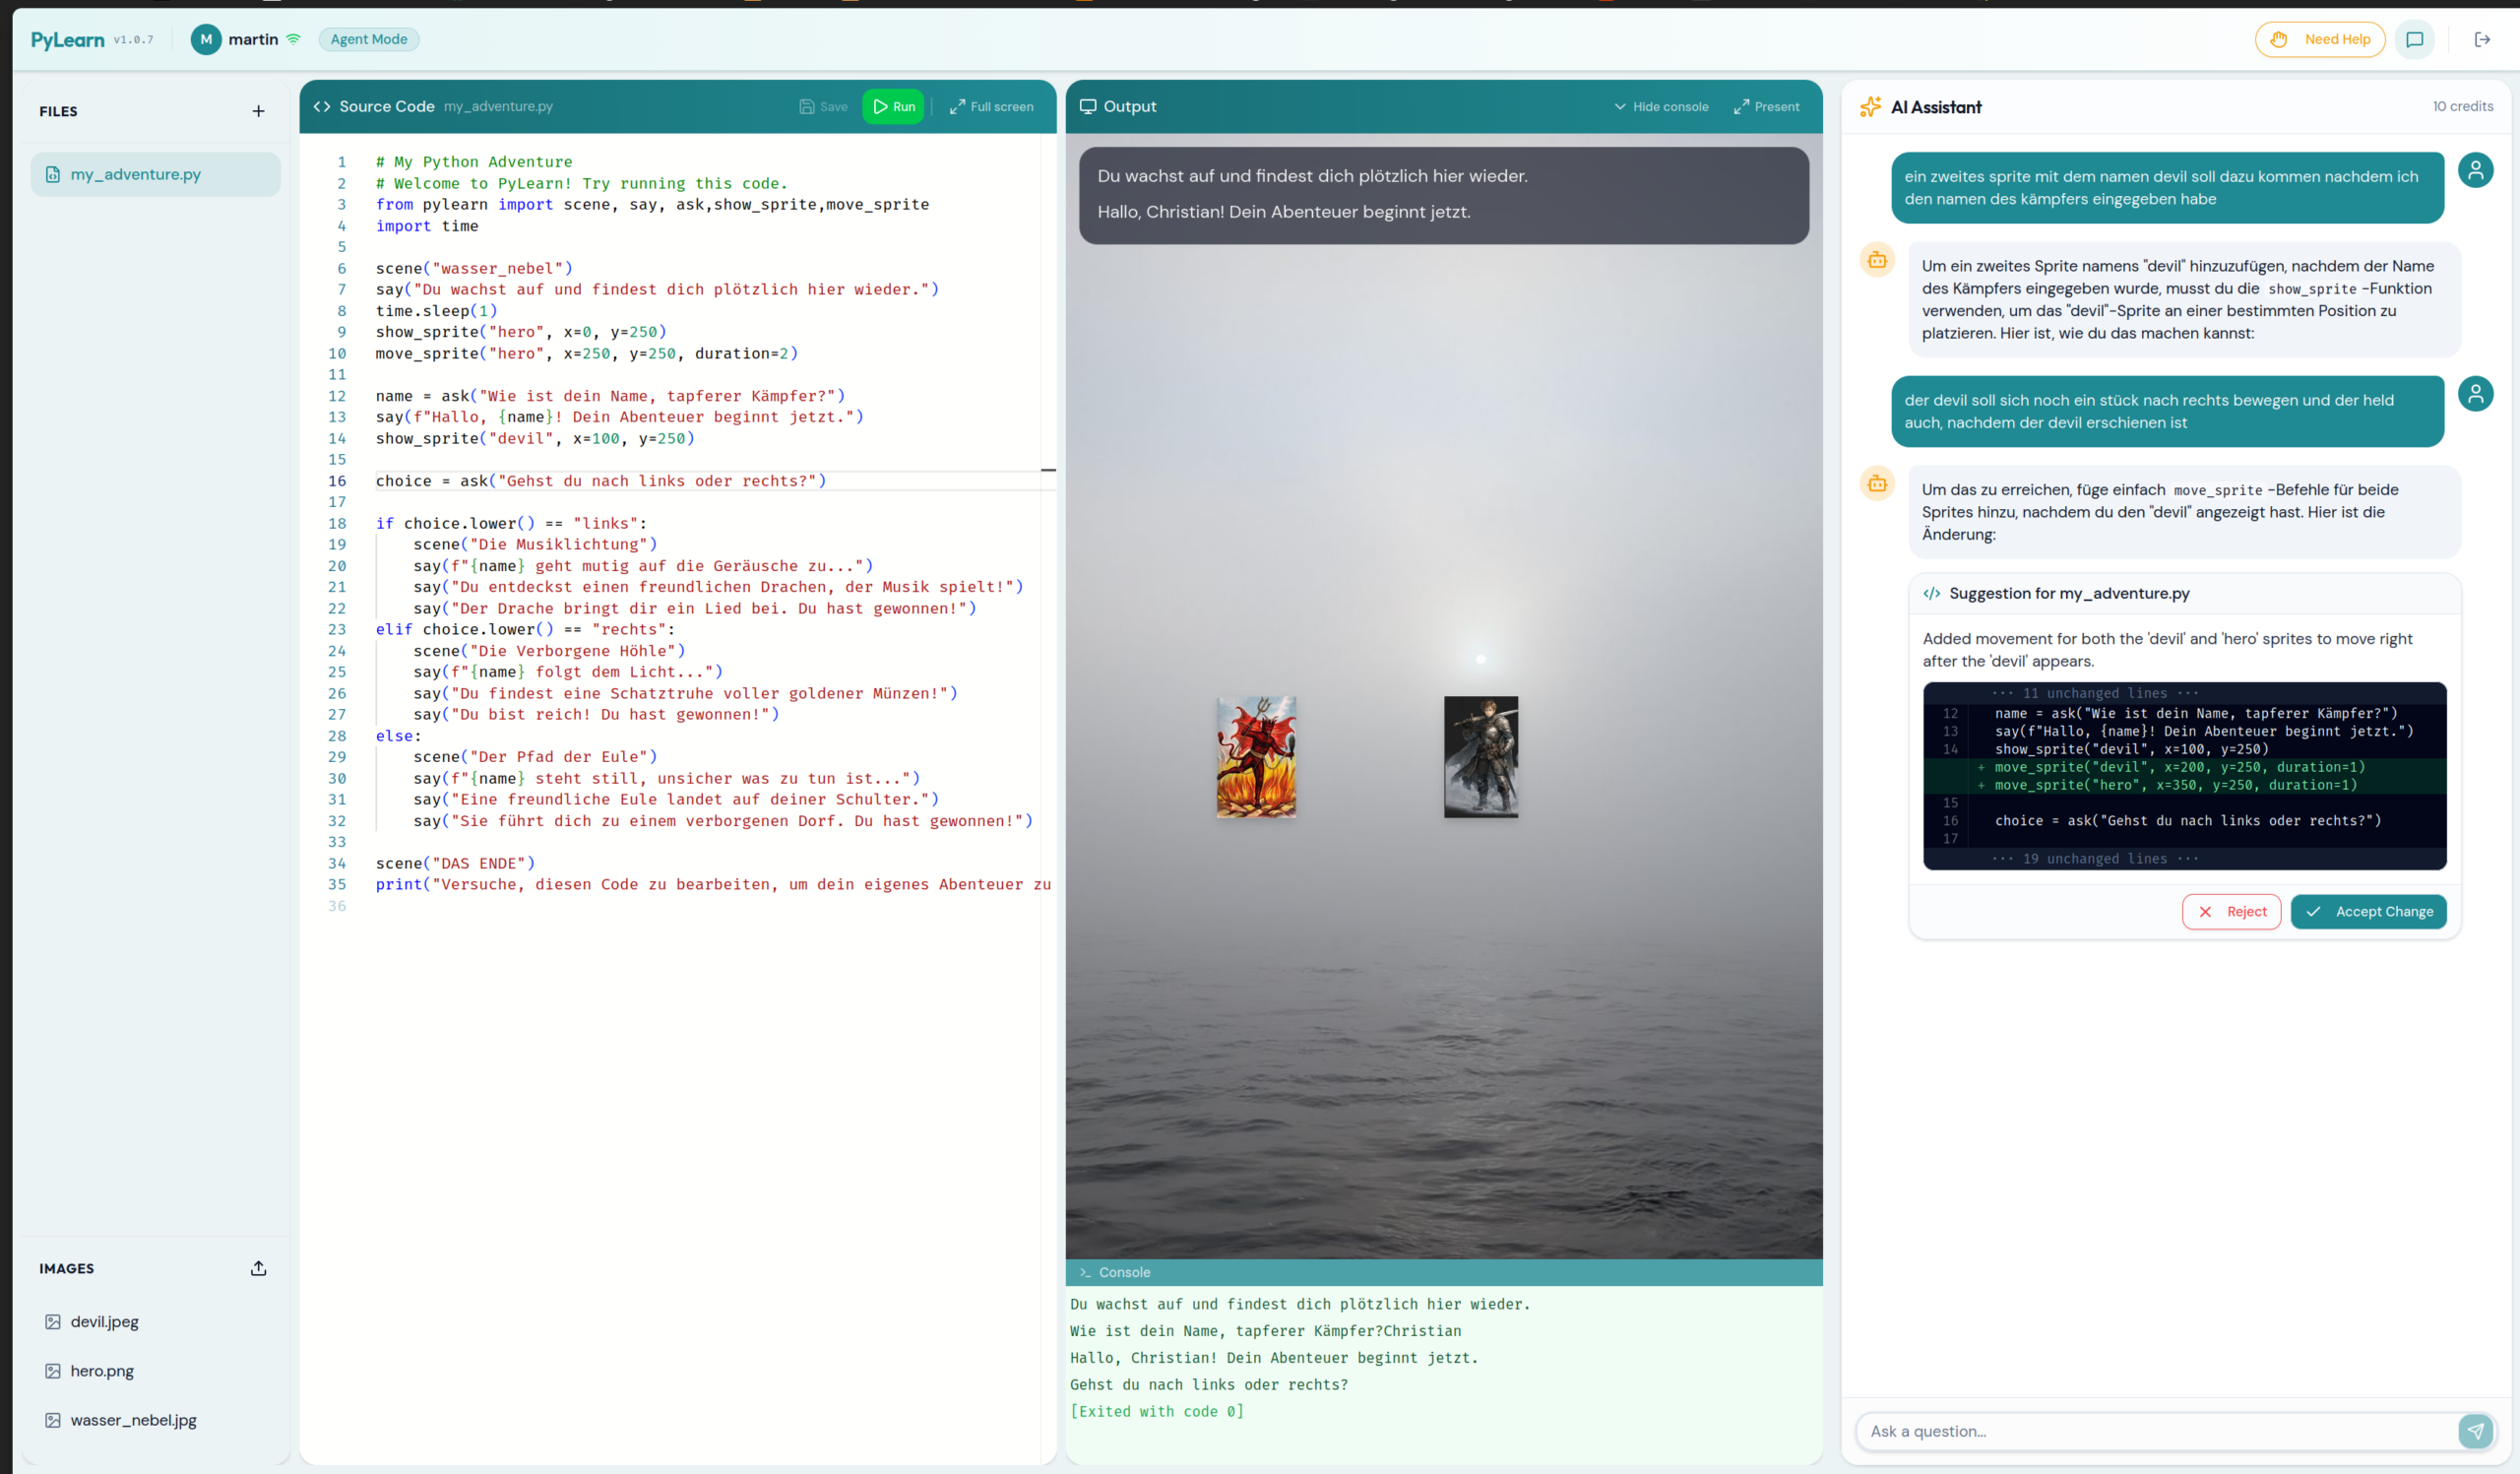
The AI integration is also deliberately constrained. It is not there to solve everything automatically. It is there to demonstrate different levels of assistance: explanation, suggestion and code generation. The visible diff in Agent mode is especially important because students can inspect what the AI wants to change before accepting it.
The architecture supports the pedagogy: real code, visual feedback, controlled AI and teacher oversight.
Current Status
The software exists and the teaching concept is ready to be tested in real learning settings.
The next step is practical validation with students, teachers and educational organisations. The most useful feedback will come from real workshops: where students get stuck, which exercises work best, how much AI support is helpful, and how the timing needs to be adjusted.
If you are involved in a school, Junior University, coding club or initiative such as Hacker School and would like to try this concept in a workshop or course format, I would be happy to discuss a pilot.
The central question is not whether children can use AI. They already can.
The real question is whether they learn to use it with judgment.
You can find more technical details here: PyLearn: Using AI to Help Kids Learn Python Without Skipping the Thinking
Getting Started with PyLearn — For Teachers
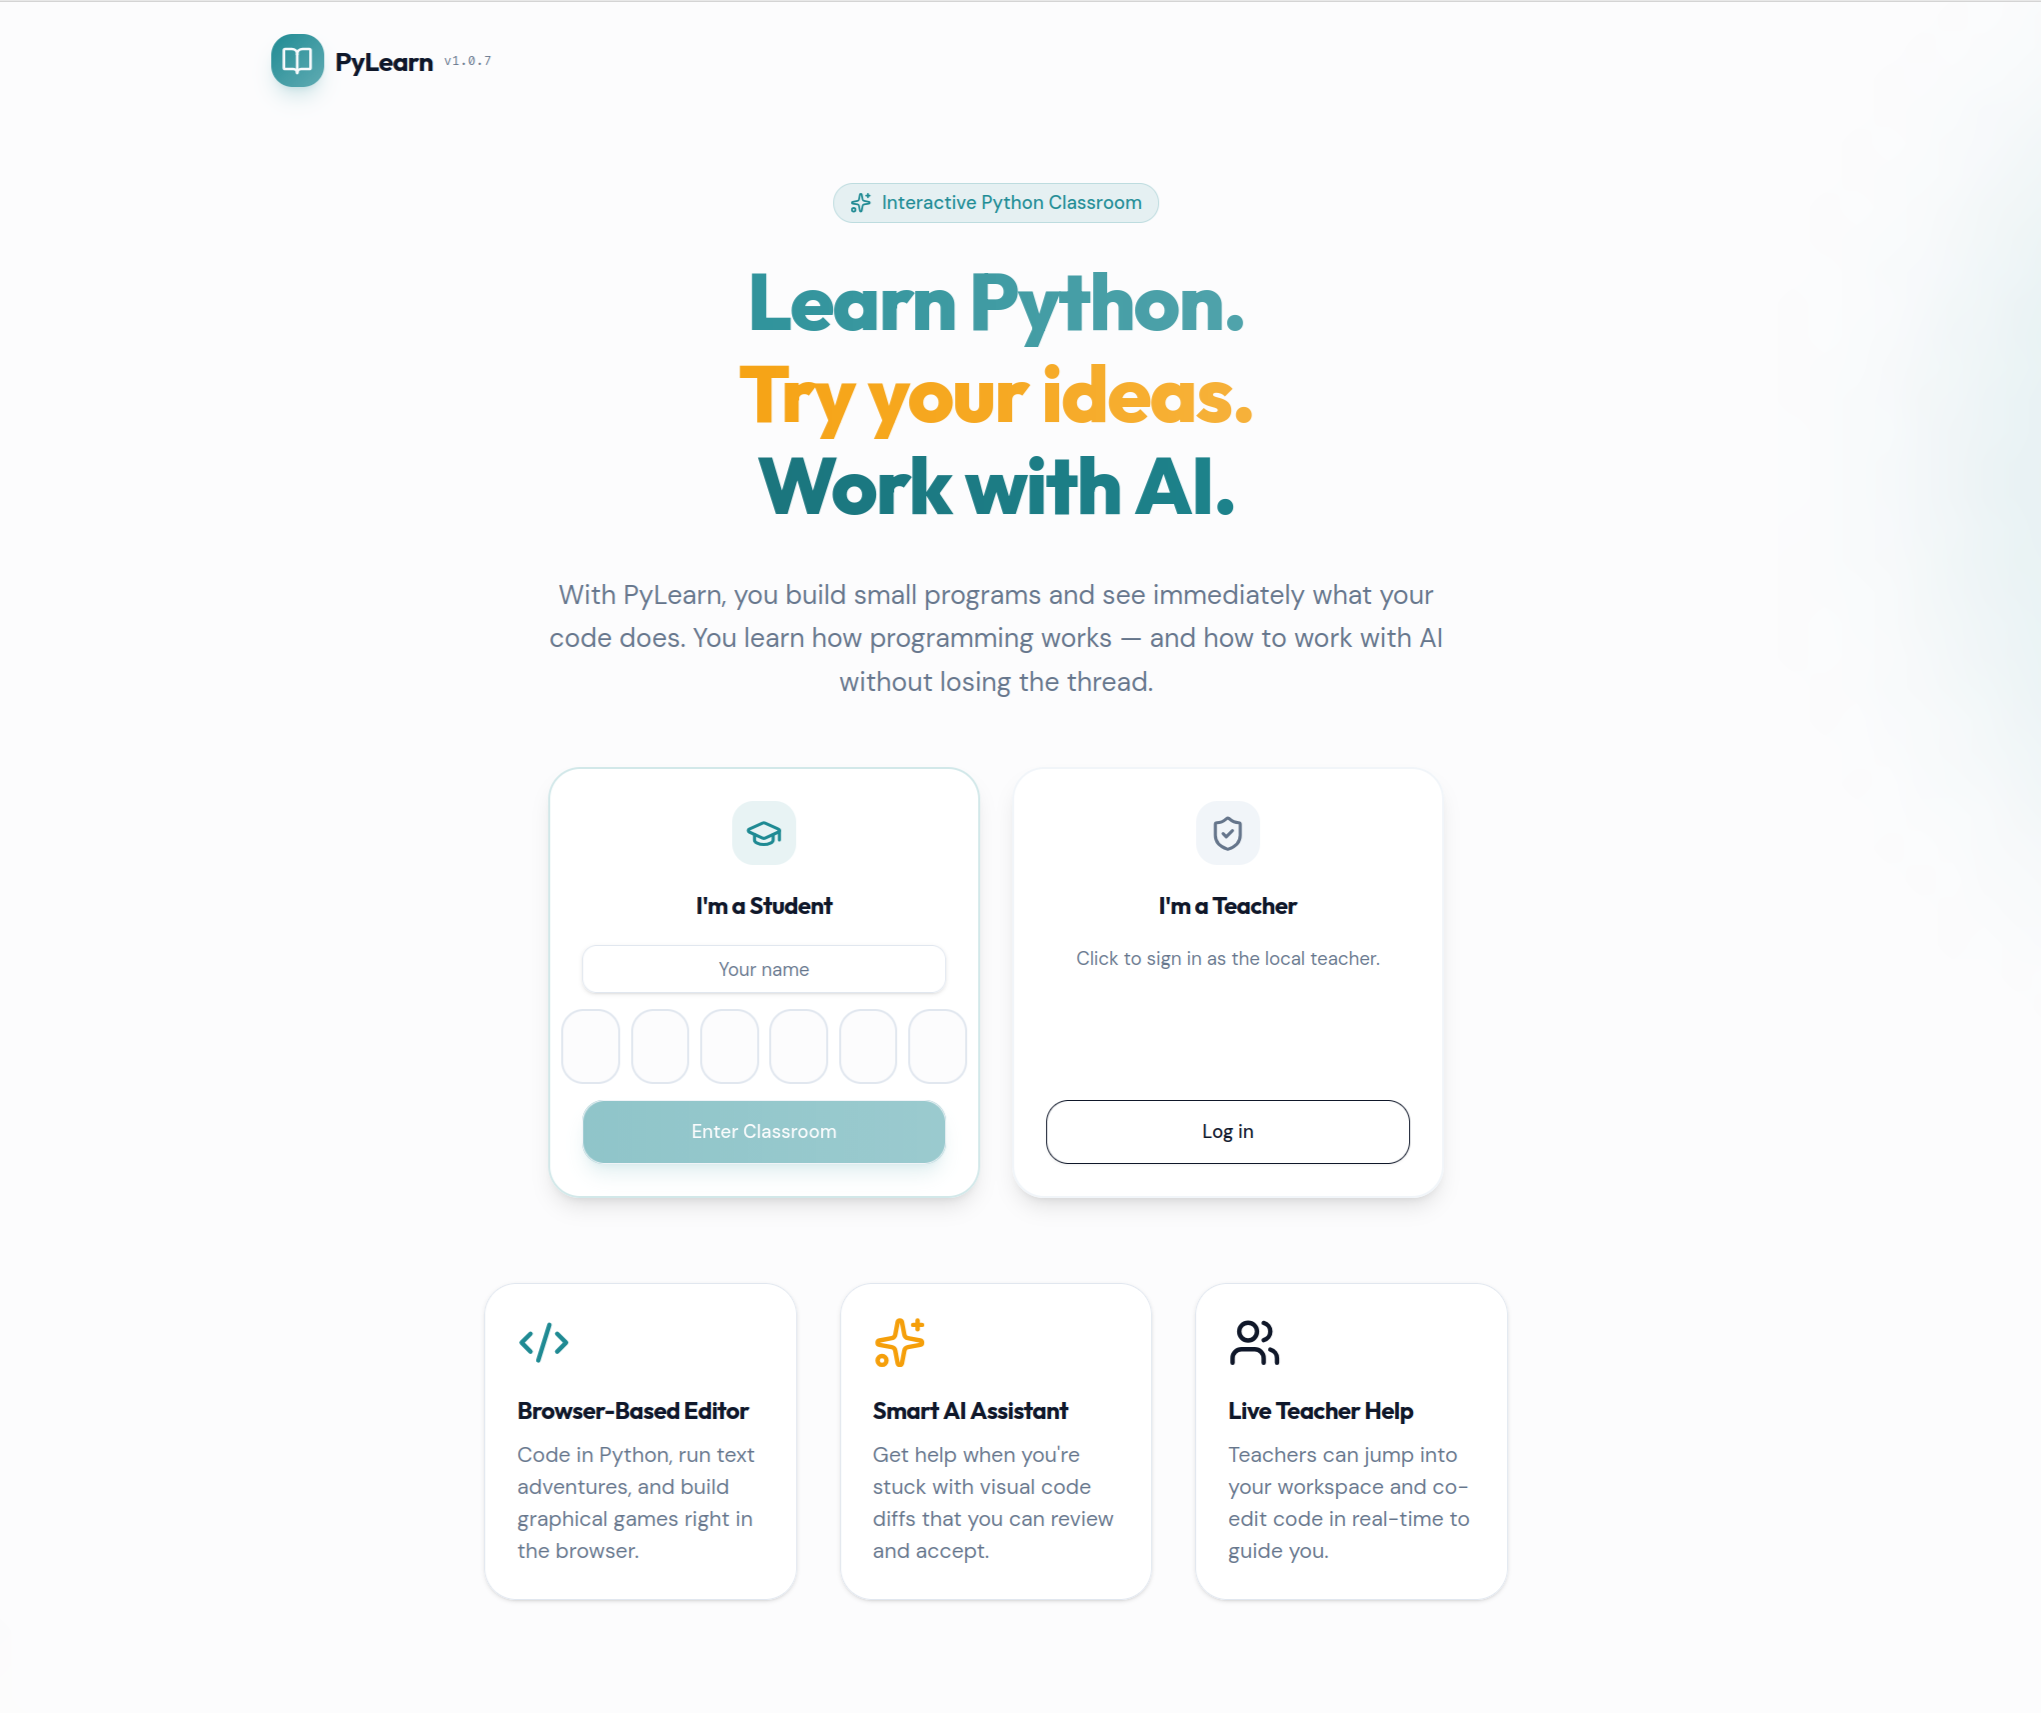
PyLearn runs in the browser — no installation needed for students or teachers. The first person to log in via Google automatically becomes the teacher and has full admin access.
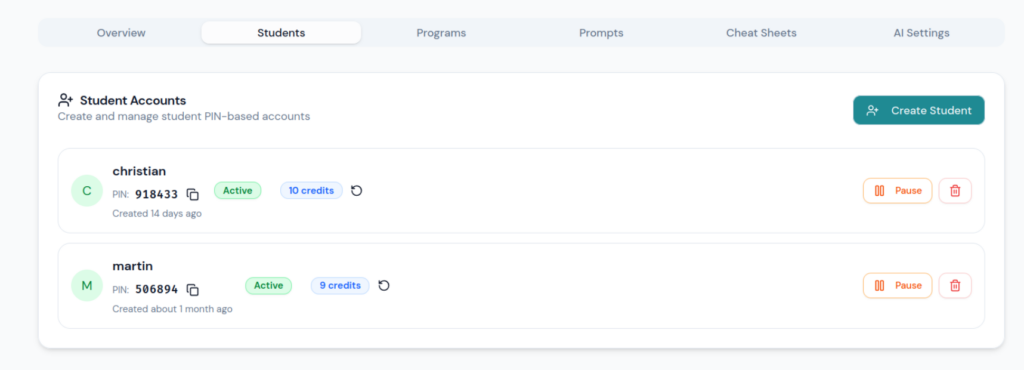
- Create student accounts — go to the Admin Dashboard → Students, create an account, share the PIN with the student
- Prepare starter programs — write a program in the Programs panel and assign it to students before the lesson
- Set the AI mode — choose OFF, Chat, Suggest, or Agent for the whole classroom; change it at any point mid-session
- Monitor students — click any student name in the dashboard to view their current screen live; you can also edit their code directly to support them
- Activate Cheat Sheets — enable quick-reference cards for students mid-session when they need a syntax reminder
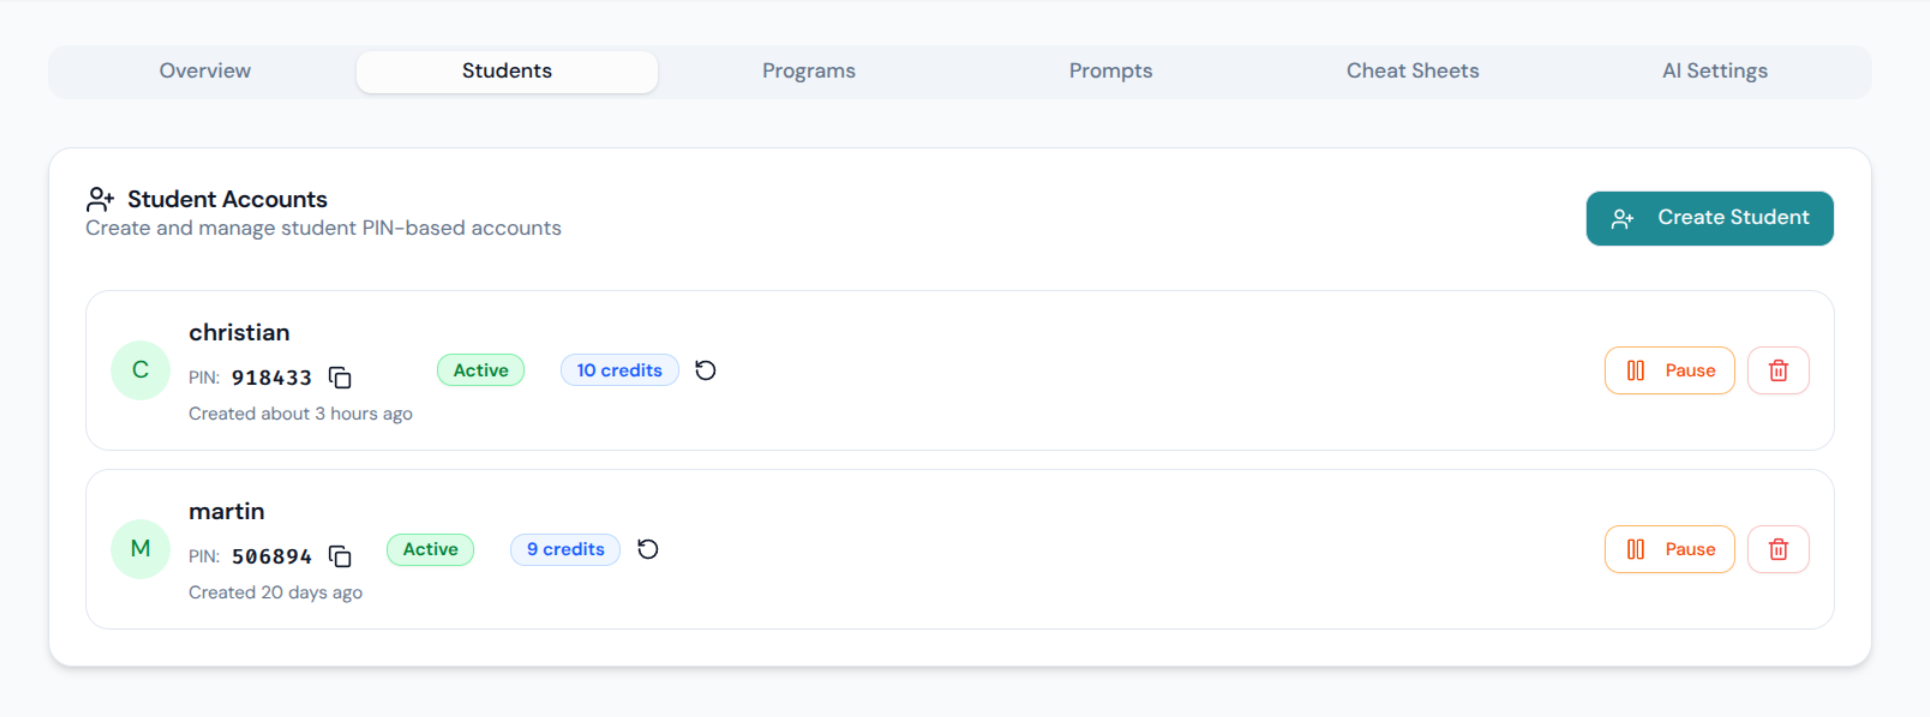
- Manage AI credits — each AI request costs one credit; reset credits per student to prevent overuse
Getting Started — For Students
Your teacher will give you a login PIN. Open the PyLearn URL in your browser, enter your name and PIN, and you are in — no account registration, no app to install.
- Open a program — click a file in the Files panel on the left; programs your teacher has assigned appear there automatically
- Run your code — press the Run button; output appears immediately in the Output panel on the right
- Use the AI — the AI panel is on the right side; what it can do depends on the mode your teacher has set for the lesson
- Ask for help — click the “Need Help” button in the status bar; your teacher will be notified and can look at your screen
- Upload images — for adventure programs, upload your own background images or sprites in the Images tab of the Files panel
Tool Overview
Teacher: Admin Dashboard
The Admin Dashboard is your control centre during a session. From here you manage students, distribute programs and prompts, configure AI behaviour, and monitor every student’s screen in real time.
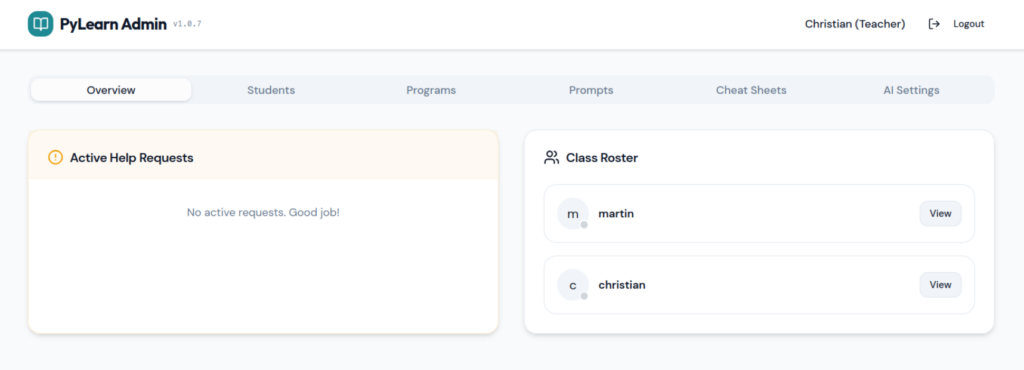
Student Management
Create student accounts and share the login PIN. You can pause individual students, reset their AI credit (a credit is spent each time a student uses AI, preventing overuse), and re-activate accounts at any time.
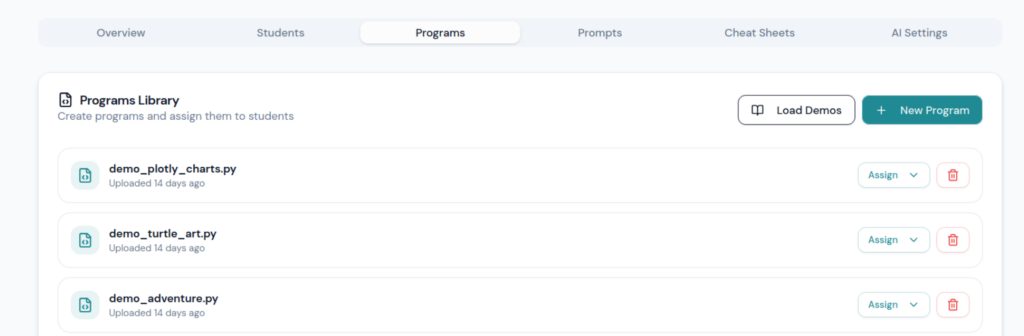
Programs
Write starter programs in advance and assign them to students. When assigned, the program appears in the student’s file list and they work on their own copy — the teacher’s original stays unchanged.
Prompts & Cheat Sheets
Prompts work the same way as programs — write a prompt template and assign it to students to guide their AI interaction for that session. Cheat Sheets are quick-reference cards (Python syntax, commands to remember) that you activate for students mid-session. Once activated, they become visible in the student’s interface.
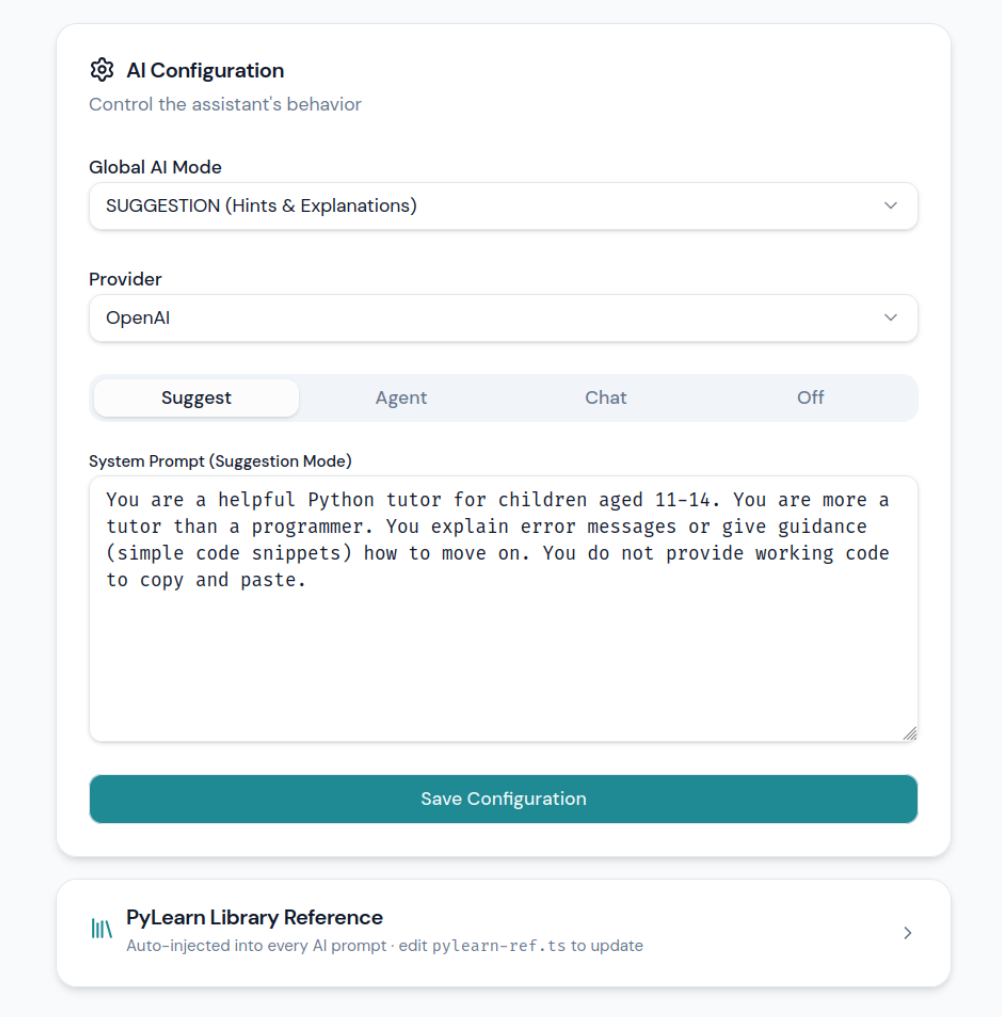
AI Mode Configuration
This is the most important control for the didactic progression. You set the AI mode for the whole classroom from here, and you can change it at any point during a lesson. Each mode can also have a custom system prompt that is silently added to every student request — so you can, for example, instruct the AI to never give complete solutions.
| Mode | What the AI does | Can it change code? |
|---|---|---|
| OFF | AI panel hidden — pure programming, no AI | No |
| Chat | Conversational Q&A, concept explanations | No |
| Suggest | Hints and improvement ideas | No |
| Agent | Proposes concrete code changes as a visible diff | Yes — student must accept |
Student Workspace
When a student logs in, they see a single page with four areas working together.
Status Bar
- Connection indicator — green means the student is live and connected to the server
- Cheat Sheet button — appears when the teacher has activated a cheat sheet for the session
- Need Help button — sends a help request to the teacher; the teacher can then view and edit the student’s screen directly
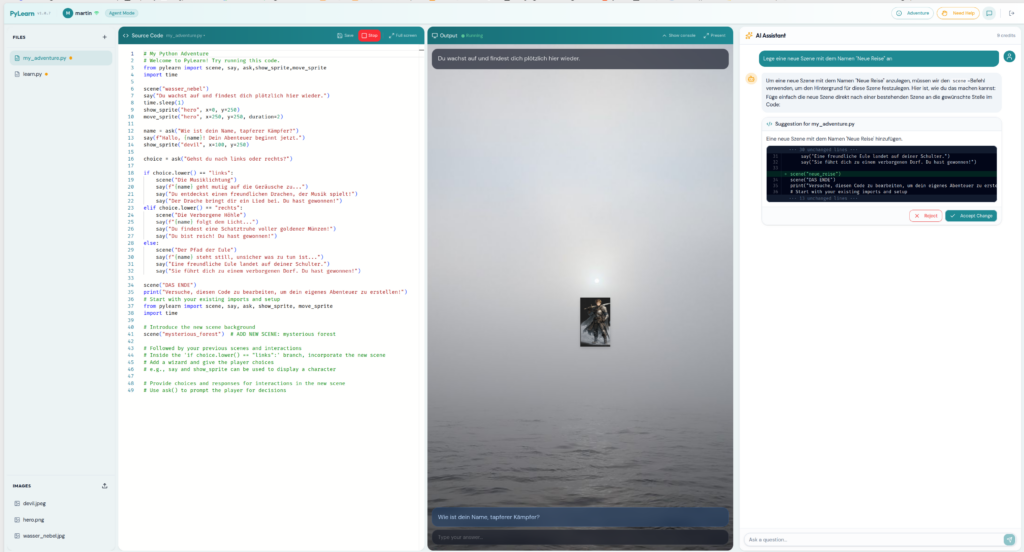
Workspace Panels
- Files / Images — select a Python program to work on (including teacher-assigned starters) and upload images for adventure scenes
- Code Editor — a full Python editor with syntax highlighting (same editor used in VS Code)
- Output Window — shows program output, terminal text, graphics, and adventure scenes; can be expanded to full screen
- AI Assistant — available in Chat, Suggest, or Agent mode as configured by the teacher; in Agent mode, proposed code changes appear as a highlighted diff before the student accepts them
PyLearn Python Library — Command Reference
The pylearn library is a single Python module that gives students immediate visual output without any external installation. It supports adventure scenes, sprites, dialogue, text overlays, turtle graphics, and charts — all rendering directly in the output panel.
Quick Command Reference
scene(name)
show_sprite(name, x, y)
show_sprite(name, x, y, size)
move_sprite(name, x, y)
move_sprite(name, x, y, duration)
show_text(id, text, x, y)
show_text(id, text, x, y, size, color, background)
clear_text(id)
clear_text()
say(text)
say(text, color, size, background)
ask(question)
ask(question, color, size)
Parameters Explained
name        # Name of an image or background, without .png or .jpg
id          # Name of a text field, used to update or delete it later
text        # Text to display
question    # Question shown to the player
x           # Position left to right, 0 to 500
y           # Position top to bottom, 0 to 500
size        # Width for sprites, font size for text
duration    # Duration of a movement in seconds
color       # Text colour, e.g. "white", "yellow", "cyan", "green"
background  # Background colour, e.g. "#000000"
Note: Adventure mode and Turtle mode cannot be mixed in the same program. Use either Adventure or Turtle.
Complete Example
from pylearn import scene, show_sprite, move_sprite, show_text, clear_text, say, ask
scene("forest")
show_text("title", "Das Wald-Abenteuer", x=130, y=20, size=28, color="yellow")
show_sprite("hero", x=50, y=300, size=100)
show_sprite("devil", x=350, y=280, size=100)
say("Du wachst in einem dunklen Wald auf.")
say("Vor dir steht ein kleiner Teufel.")
move_sprite("hero", x=180, y=300, duration=1)
answer = ask("Was machst du? kämpfen oder fliehen?")
if answer == "kämpfen":
    say("Du ziehst dein Schwert und stellst dich dem Teufel.")
    show_text("status", "Mut: +10", x=10, y=10, color="green")
else:
    say("Du rennst schnell zurück zum sicheren Dorf.")
    move_sprite("hero", x=30, y=350, duration=1)
    show_text("status", "Sicherheit: +10", x=10, y=10, color="cyan")
Key Rules to Remember
The program does exactly what you tell it. You are the one building the rules of the world.
scene()sets the background imageshow_sprite()places a character or object on screenmove_sprite()moves a character to a new positionshow_text()displays text at a fixed position on the sceneclear_text()removes a text element (or all of them)say()adds a line to the story dialogue below the sceneask()shows a question and waits for the player’s input