44-2.de

Understanding technology by building it

Category: AI-Assisted Development

  • Claude Code in a Dev Container: From Coding Help to System Thinking

    Claude Code in a Dev Container: From Coding Help to System Thinking

    Something shifted in how I program. Not just in the tools I use — but in how I think about the work itself.

    It’s Not Really an Agent. But It Feels Like One.

    I recently wrote about why context is the missing layer in AI-driven work — the idea that the sequence is Data → Analytics → Context → Action, and that without context, even smart systems stay limited. You can read that post here.

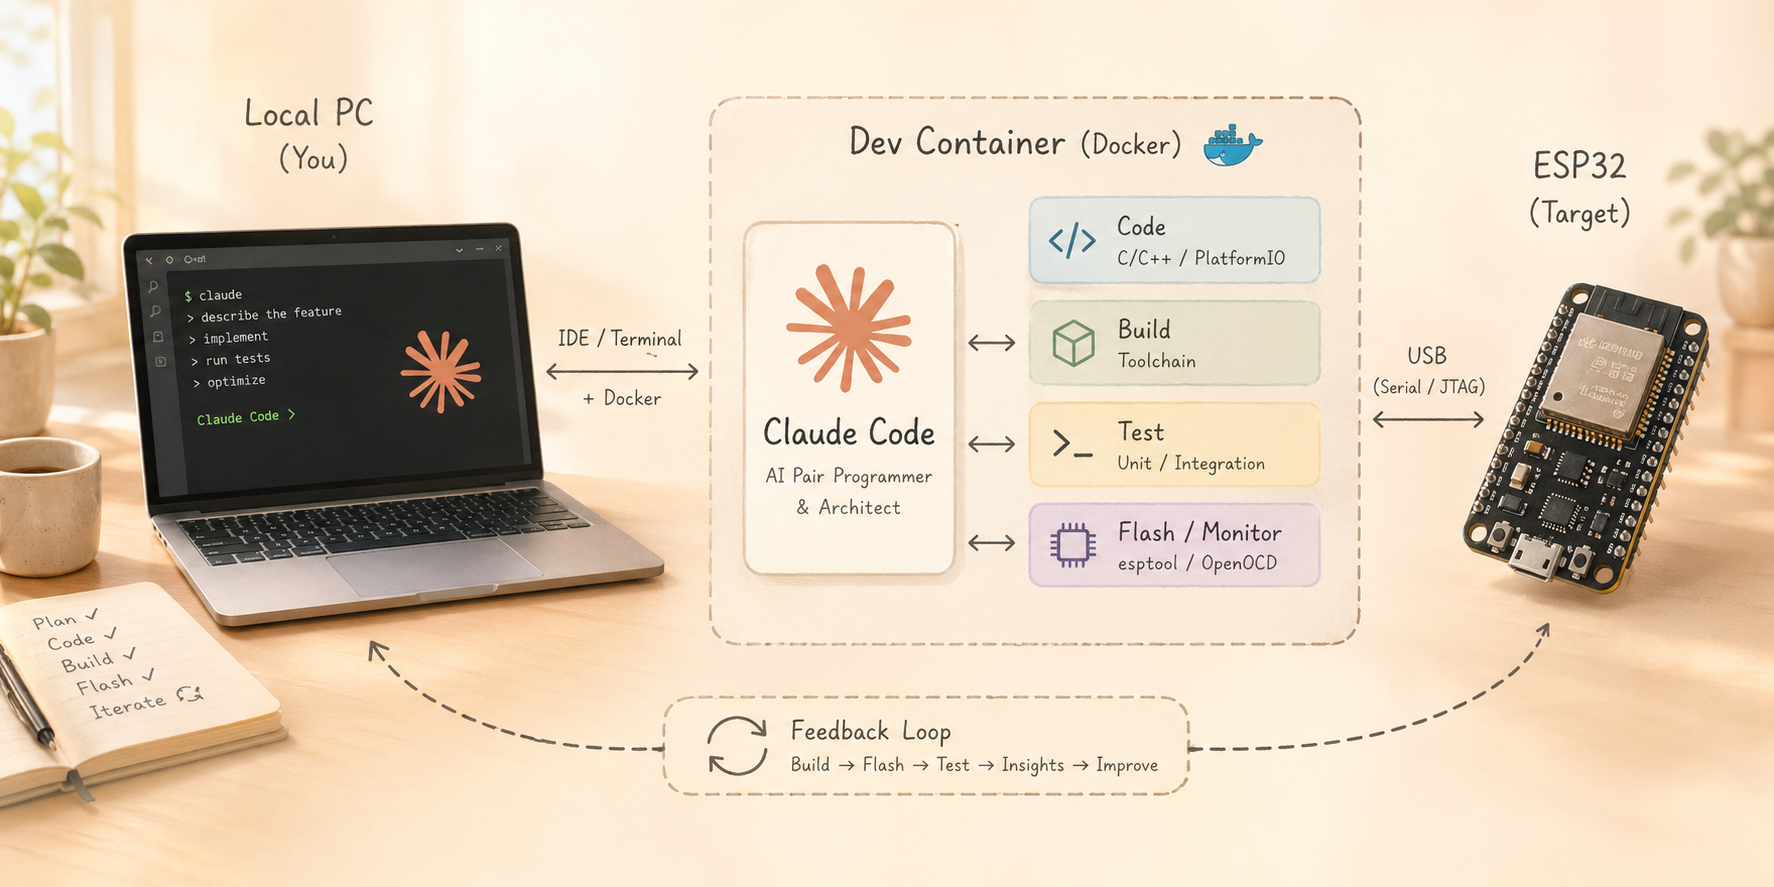
    Claude Code is a good example of this in practice. It’s not a true autonomous agent. It doesn’t plan multi-step strategies on its own. It doesn’t have memory across sessions by default. But when you give it the right context — the codebase, the requirements, the error logs, the hardware specs — something interesting happens. It starts to act rather than just answer. It writes, runs, reads the output, adjusts, and iterates. That feedback loop — code, execute, observe, fix — is what makes it feel agentic, even though technically it isn’t.

    The intelligence was always there in the model. What unlocks it is context. And building the right container for that context — literally and figuratively — is what this post is about.

    The Old Way Was Frustrating

    I started experimenting with Claude Code early on. The concept is great: give an AI a task, let it write code, run it, see what breaks, fix it, repeat. Fully autonomous.

    But the default experience was painful. Constant confirmation prompts. “Should I proceed?” — yes. “Are you sure?” — yes, just do it. That kills any sense of flow.

    Then I heard about --dangerouslySkipPermissions. That removes all the guardrails. Claude just executes. Which sounds great — until you realize you’re running an autonomous AI agent with full access to your actual PC. Your home directory. Your SSH keys. Everything.

    I also tried running Claude on an isolated machine — an old Raspberry Pi — which worked but was awkward and had no real development environment. Not a long-term solution.

    A Swiss Guy on YouTube Had the Right Idea

    I stumbled across this video. Andreas Spiess — strange accent, great ideas — who simply installed Claude Code inside a virtual machine and ran it with full permissions there. Clean isolation. No risk to the host.

    The direction was right. But a full VM is heavy. I wanted something lighter, faster to spin up, and more developer-friendly.

    After a bit of research I found VS Code Dev Containers — and they turned out to be a perfect fit.

    What Is a Dev Container?

    A Dev Container is just a Docker container — but with a special .devcontainer/ configuration folder in your project. When you open the project in VS Code, it detects this config and asks: “Reopen in Container?”

    You click yes. VS Code reopens. Same editor. Same extensions. Same terminal. But now everything runs inside Docker. The container is isolated from your host. Your actual filesystem, your home directory, your other projects — invisible and unreachable from inside.

    You don’t even notice you’re in a container. That’s the point.

    This is exactly the sandbox Claude Code needs to run with full permissions safely.

    The Template I Built

    I created a reusable template on GitHub — a ready-to-use Dev Container setup for Claude Code with a clear security model and a practical project structure.

    Security model — what’s protected:

    • Host filesystem: only the ./project folder is mounted — nothing else on your PC is visible inside the container
    • No privileged mode: the container cannot escape to the host kernel
    • SSH keys: never copied in — the host SSH agent socket is forwarded, keys stay on your machine
    • GitHub token: passed as env var, never stored in the container
    • USB access: hot-plug support for ESP32 and Arduino via device_cgroup_rules — no full /dev access needed

    There is also an optional outbound firewall that restricts Claude to allowlisted domains only (Anthropic API, GitHub, npm, VS Code). I usually leave it off and just watch what Claude does — but it’s there if you want it.

    The Project Structure — Context Is Everything

    The container gives Claude a clean, isolated workspace. But the real insight is what’s inside the project/ folder. This is where context lives — and context is what makes Claude Code go from impressive demo to actual tool.

    project/
      CLAUDE.md          ← session bootstrap: tells Claude what to read at startup
      requirements.md    ← what you're building — written by you, for Claude
      memory.md          ← live session memory — Claude writes here
      skills/            ← working conventions, loaded every session
      knowledge/         ← confirmed config and integration notes
      external-docs/     ← raw reference material (API docs, specs)
      src/               ← the actual source code

    Every session, Claude reads CLAUDE.md first. That file tells it to load requirements.md, all skill files, and all knowledge files before doing anything else. Claude knows the full project context before writing a single line of code.

    requirements.md is the key file — and writing it is now your main job. You don’t write code anymore. You write what you want. You describe the feature. You think through the architecture. You define constraints. You specify the behavior. Claude reads it and implements it.

    This is the shift I mentioned at the start. You move from coder to architect. The work changes — it’s not about syntax anymore, it’s about clarity of thought. If you can describe what you want precisely, Claude can build it. If your requirements are vague, the output will be vague. Good thinking produces good code.

    Skills are reusable context. A skill file can define how to structure code for a specific hardware board, which GPIO pins are available, what libraries to use, what pitfalls to avoid. You write the skill once — and swap it in for every project that uses that board. Claude immediately works more efficiently because it already knows the environment before you start.

    Knowledge files accumulate truth. When Claude figures out a tricky integration — a working config for a library, a confirmed pin mapping, a tested setup — it writes it into knowledge/. Next session, it starts with that already loaded. No re-discovery.

    Starting a New Project: Three Steps

    The template is designed to be copied per project. Starting fresh is fast:

    1. Copy the template folder, rename it to your project name
    2. Edit .env: set COMPOSE_PROJECT_NAME to something unique
    3. Open the folder in VS Code → “Reopen in Container” → enter API key → start Claude with --dangerouslySkipPermissions

    Each project gets its own isolated container, its own Claude config volume, its own shell history. No cross-contamination between projects.

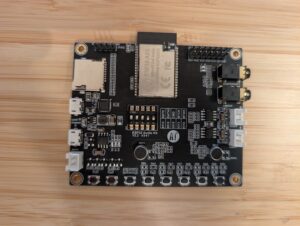
    The ESP32 Feedback Loop — Hardware Gets Interesting

    The USB passthrough is what makes hardware projects genuinely exciting.

    Claude Code doesn’t just write firmware — it flashes it to the ESP32 via USB, reads the serial debug log, and reacts to errors automatically. The loop looks like this:

    Write code → flash → read serial output → fix error → flash again.

    All without me touching anything. Claude drives the entire cycle.

    I was building a touch display project. Claude couldn’t see the screen, obviously. So it just asked me: “I can’t see the display. Does it look correct? Just say yes or no.” Otherwise it was perfectly happy reading the debug port and iterating on its own.

    That feedback loop is the concrete, hardware version of the same principle from my other post. The model is smart. But what makes it act is context: the code, the error log, the serial output, the confirmed hardware config in knowledge/. Remove any of that and the loop breaks.

    Real Projects Done This Way

    This isn’t theoretical. I’ve used this setup to build several actual projects:

    • Soundbox — hardware audio project with ESP32: Claude wrote the firmware, flashed it via USB, read the serial log, debugged autonomously
    • PyLearn — a Python learning app, posted here on 44-2.de — built in a few evenings
    • A Firefox extension that expands the Perplexity chat sidebar to full screen width — one evening, done

    Projects that would have taken me weeks now take two or three evenings. And the code quality? Honestly, at least as good as mine. Often better structured. Sometimes better documented than I would have bothered to do.

    Watch Out

    A few real risks to know about:

    • API costs: Claude calls the Anthropic API freely from inside the container. Set a spend limit at console.anthropic.com — seriously, do it before you start.
    • Git push risk: Claude has access to your forwarded SSH key and can push or delete remote branches. Protect your important branches on GitHub, or set ENABLE_GIT=false in .env.
    • USB security: The /dev filesystem is bind-mounted for USB support. Only ttyACM and ttyUSB device classes are accessible via cgroup rules — but understand what you’re enabling.
    • Firewall bypass: If you enable NET_ADMIN for the optional firewall, Claude could theoretically flush its own iptables rules. Acceptable if you trust the model. Remove the capability if you don’t.

    Container isolation is very good. It is not magic. Know the tradeoffs.

    What’s Next

    A few things I want to explore:

    • More skill files for different hardware boards — ESP32-S3, RP2040, different Arduino variants — each with pinouts, known-good libraries, and gotchas already loaded
    • Better firewall profiles: project-specific allowlists rather than one global list

    The deeper idea here is that skill files could become a community resource. Share the skill for your board, your framework, your setup — and everyone’s Claude sessions get smarter about that environment immediately.


    The template is on GitHub: happychriss/claude-code-container

    Copy it. Edit requirements.md , change the .env file with your project name, and if needed update your USB device. Describe what you want to build (and if you like – which platform or language). Watch what happens.

  • ESP32 Soundbox in an IKEA Frame: A Weekend Hardware Build with AI Support

    ESP32 Soundbox in an IKEA Frame: A Weekend Hardware Build with AI Support

    A friend of mine has a very particular taste in music. So when our group decided to give gifts that all fit into a common frame — literally — I had an idea. Why not build an actual sound machine inside an IKEA picture frame? Total budget: under €30, one weekend, and one AI coding assistant. Let’s go.


    The Hardware

    I didn’t have much time, so I just ordered everything from AliExpress in one shot:

    • Ai-Thinker ESP32-Audio-Kit (ESP32-A1S V2.2) — ESP32 with onboard ES8388 audio codec, two NS4150 class-D amplifiers, SD card slot, Bluetooth, six hardware buttons, all in one board. About €17.
    • WS2812B LED strip, 30 LEDs — individually addressable RGB, wired to GPIO22. Around €4.
    • Two small speakers from my parts bin.
    • A 5×7″ IKEA picture frame — €5.
    • A USB power cable for 5V supply.

    That’s it. No custom PCB, no breadboard rats’ nest. The board has two USB connectors — one for flashing, one for power — which makes things even cleaner.

    The speakers sit inside the frame glued to the plastic backing. If I were to rebuild this, I’d attach them directly to the wooden frame itself so it acts as a resonance body — the 6W amplifier is there, the 4Ω drivers are there, but right now the sound escapes through plastic. It still sounds surprisingly good for five-euro speakers. With the frame as resonator it would be genuinely excellent.

    The Build

    Everything fits together with double-sided tape and a hot glue gun. The only soldering needed is:

    1. Speaker wires to the board’s JST connector pads
    2. LED strip power + signal wire to the board

    The board is recessed slightly into the back of the frame so nothing sticks out beyond the frame depth. You can hang this directly on a wall.

    One small thing I’d add next time: an external power switch. Right now you unplug it. Works fine, but still.

    What It Does

    The feature set ended up being pretty complete:

    • Plays all .mp3 files from the SD card root in alphabetical filename order, looping forever
    • _welcome.mp3 always plays first on boot (underscore sorts before letters) — the box greets you with a purple light frame
    • KEY1 short-press: pause/resume
    • KEY1 long-press (2 s): toggle Bluetooth A2DP sink mode — LEDs pulse blue during pairing, then your phone streams audio through the same codec and the same LED show
    • KEY3/KEY4: previous/next track
    • KEY5/KEY6: volume down/up
    • Bluetooth device name: Dietmars-Soundbox (personalized gift, obviously)

    The LED Show

    This is where it gets technically interesting. The LED task runs a 5-layer composited show on Core 0:

    1. Ambient — slow color breathing based on overall volume
    2. Beat burst — flash on kick detection
    3. Bass blob — low-frequency energy mapped to brightness
    4. Sparkles — random high-frequency glints
    5. Picture frame — the four sides of the frame each get a distinct hue, driven by volume tier

    The audio pipeline works like this: PCM samples are tapped from the I2S write callback (both in SD and Bluetooth mode), converted from stereo int16 to mono float, and pushed into a stream buffer. The LED task drains that buffer, runs a 512-point FFT with a Hann window, splits the result into 8 logarithmic bands from 60 Hz to 20 kHz, applies per-band AGC with a ~10 s time constant, and does beat detection via a dual-EMA sub-bass ratio: kick_fast / kick_slow > 1.3, with a 200 ms minimum gap between beats.

    At quiet passages the frame breathes in calm colors at low saturation. Loud and fast music triggers full-saturation disco snaps where each side of the frame gets a randomly assigned hue with ~80–120° forced separation — so you never get two sides the same color by accident. Volume tiers (quiet / mid / loud) control how many frame sides are lit at once.

    It genuinely sets the mood of a room. That part was satisfying to see work.

    Building It With Claude Code

    I had a Docker container from a previous project — Ubuntu base, Node.js, @anthropic-ai/claude-code installed, USB serial device passthrough configured via docker-compose.yml. I dropped all the AliExpress datasheets and board schematics I could find into an external-docs/ folder, wrote a rough requirements.md, and let Claude loose.

    The setup is worth describing: the repo has a CLAUDE.md that tells Claude to read requirements.md, all skills/ files (working conventions per concern), and all knowledge/ files (validated config notes per component) at the start of every session. This way Claude has context persistence across sessions without relying on conversation history. Each time Claude confirms a working configuration, it writes a note into knowledge/ — so the next session starts with what was already proven to work.

    The first challenge was getting audio out at all. The ES8388 codec is sensitive to init order: SD card must mount before I2S init (GPIO25/26 conflict), MCLK must be stable for 100 ms before codec init, and you must use I2S_CLK_SRC_DEFAULT — APLL causes broadband white noise on ESP32. Claude worked through all of that by trying, failing, reading the error, and adjusting. The right path was to use espressif/esp_codec_dev and never write ES8388 registers directly.

    There was also a nasty bug where every song with embedded cover art crackled at the start. The cause: the ID3v2 tag can contain a several-hundred-KB JPEG, and the Helix MP3 decoder was scanning through it byte-by-byte looking for a sync frame, starving the I2S DMA buffer. The fix was to parse the syncsafe size from the ID3v2 header and fseek() past the entire tag before handing the file to the decoder. Claude found this independently after I described the crackling symptom.

    Bluetooth required a custom 3 MB partition table because the BT stack pushes the binary to ~1.1 MB. The A2DP data callback must be strictly non-blocking — push to a StreamBufferHandle_t, drain on a separate task on Core 1 — otherwise you drop the BT link under any load.

    I’m a decent programmer. I would have needed two or three weekends to get all this working on my own. With Claude Code it was one.

    Bill of Materials

    PartCost
    ESP32-Audio-Kit (A1S V2.2, ES8388)€17
    WS2812B LED strip (30 LEDs)€4
    IKEA picture frame€5
    Misc (USB cable, tape, glue)~€3
    Total~€29

    Speakers from the parts bin, SD card from a drawer. Add another €5 if you’re buying those.

    What’s Next

    The natural upgrade is a small 5V LiPo under the frame for wireless wall-hanging. The LED strip needs 5V anyway, so no boost converter required — just a tiny LiPo with a TP4056 charger board under the frame. And a proper external power switch.

    Full source and the devcontainer setup are on GitHub.


    A few things I took away from this: cheap AliExpress hardware is genuinely capable if you understand what you’re buying. The ES8388 codec is a real audio chip — it sounds good. And Claude Code is a legitimately useful tool for embedded work, not just web stuff, as long as you give it structured context. The knowledge/ folder approach — where confirmed hardware facts accumulate across sessions — made a real difference. It’s worth setting up properly.


    GitHub: happychriss/ESP32-A1S-sound-machine

  • Publishing with AI: A WordPress MCP Workflow

    Publishing with AI: A WordPress MCP Workflow

    Tonight I connected Perplexity directly to my self-hosted WordPress site at 44-2.de — using the WordPress.org MCP connector via Pipedream. The idea: talk to an AI, end up with a published post. No copy-pasting, no switching tabs.

    How to set it up

    1. In WordPress admin, go to Users → Add New. Create a user with the role Editor. Don’t use your admin account.
    2. Open the new user’s profile, scroll down to Application Passwords. Enter a name (e.g. “Perplexity MCP”) and click Add New Application Password.
    3. WordPress shows you the password once. Copy it immediately — you won’t see it again. The name is just a label; the long generated string is the actual password.
    4. Go to the Perplexity add-on page and connect the WordPress integration. Enter your site URL (with https://, not http://), the username, and the application password.
    5. The “connection authenticated” confirmation does not verify your credentials actually work — it only checks that a connection was made. The real test comes when you try to use it.
    6. In the Perplexity chat, press +, add the WordPress MCP, and you’re ready to go.

    What tripped me up

    Wrong user — I started with the admin account. Admin should stay for admin things.

    Pipedream doesn’t auto-refresh — After switching users in WordPress, Pipedream kept using the old credentials. You have to disconnect and reconnect manually for changes to take effect.

    The Application Password UI — I was copying the name instead of the generated password. WordPress shows the actual password once, right next to the name field. Easy to miss if you’re not looking for it.

    What’s next

    GitHub is next. The plan is that progress on projects — commits, notes, decisions — flows into posts through conversations. This post was written and published entirely through the MCP connection. That’s the point.