Last Updated 4 years ago by cneuhaus
In this article I will describe for a non technical person what it takes to train a 8€ device (I used the ESP32 with an I2S 43434 i2s-MEMS-Microphone) to listen to a voice, so it can understand 12 different words (numbers, yes , no). It covers the full cycle, to make it more fun I added “transfer learning” to avoid a problem called “Overfitting”, that is a common issue in many model. I will also share some key-findings on Machine-Learning (ML) and what I learned.
At the end you may have a better feeling, what ML means..and hopefully why its fun playing around with it.
And not to forget: You may realize that this is *NOT* artificially intelligent, but just a smart algorithm that is trying to solve a mathematical problem. When its done well, it understand the numbers 🙂
You can check-out the results of my exercise here:
Motivation – Democratization of Artificial Intelligence / Machine Learning
Working in Data & Analytics means, you are exposed to Machine Learning: its everywhere. During a Hackaton on ML I had the opportunity to get lean a lot on data analytics platforms as Dataiku, DataRobot, Domino, Matlab – that help you over the full cycle from data transformation, feature generation, model development, deployment and operationalization. We finally did the Hackaton with Dataiku (hey, I am now certified Dataiku Core Designer). Its eye opening once you understand how easy it is to use ML into your daily business, from outlier detection (find strange numbers) to time series forecasting (predict sales).
New tools and platforms, from Google (Tensorflow), Dataiku basically results in a democratization of ML, they remove the burden to understand the mathematics and seamless integrate into the existing IT landscape.
With a non – coding environment its also empowering business and makes it available to everybody….
I don’t recall how I stumbled over Edgeimpulse – can this be, that its really so easy to train a cheap microprocessor (like an ESP32 for 8€ to listen to my voice commands? Obviously that is possible and really easy, watch this Video, you will learn a lot. Edge Impulse was designed for software developers, engineers and domain experts to solve real problems using machine learning on edge devices without a PhD in machine learning.
So…what did I actually do?
Google Tensorflow is a free open-source library for machine learning, with focus on training and inference (when you actually run the network to do something useful). Normally (especially for training) you need a lot of computer power to train or run the model. BUT -there is a variant of TensorFlow – a light version called “TensorFlow Lite for Microcontroller” that is designed to run on embedded devices (like the ESP32) in a view kilobytes of memory. This is actually a revolution, so ML can move from the cloud into any device!
Lets have a look how it goes and see if we can get it running with my voice!
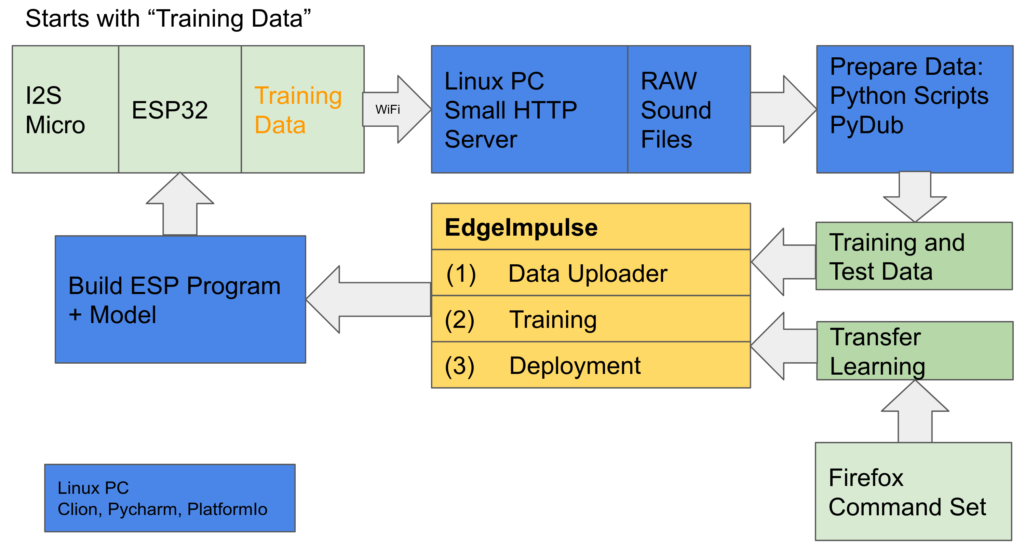
Following the standard flow of machine learning, here is the high level overview of my process (can be shorter, but I want to have full control over it – and learn)
- Record training data and sent it to the local Linux PC – raw sound files with 1min of myself repeating “one, one, one…” 🙂
- Using Python scripts to clean up the data (specially split the file in equal long sound clips)
- Extra Exercise (I will explain later): Use parameter of a Pre-Trained model (box: Transfer Learning)
- Following is on EdgeImpulse (cloud):
- Upload the training data
- Feature Generation – Prepare the features (that is the data actually loaded “into the model”) from the training data
- Train the model, and check the performance
- Deploy (download) the trained model (as Arduino c-code) ready to run on ESP32 – what I think is really great feature of EdgeImpulse
- Build the image/program in “C” and upload to the ESP
- Enjoy it working..
Ok….honestly…it needs to be clear that this is a loop… and I went this circle many times.
1 – Get Training Data
Record training data (as more, as better) – in my scenario my voice (the numbers from zero to ten, yes and no) as .wav files with an ESP32 and I2S Microphone for recording (I2S is a 3 wire interface for sound). EdgeImpulse provides a data forwarder, that allows you to directly upload the data into the cloud, so it can be used for training.
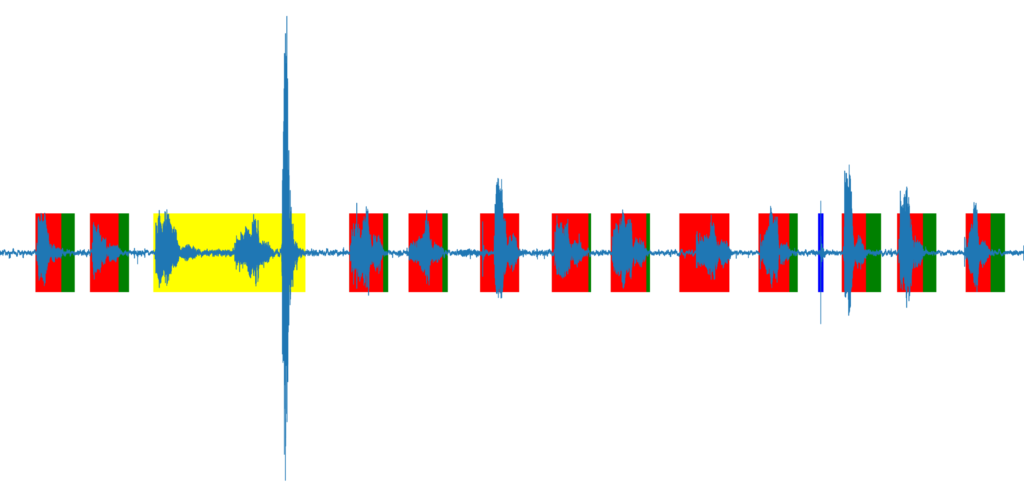
But I wanted to be able to process or adjust my voice data before uploading, so the approach was different, I recorded the voice on the ESP32, sent it via Wifi to my desktop PC. That enabled me to pre-process the data: I used Python and PyDub to split the file based on silent detection, so each snippet contains exact one number. Each sound snipped was adjusted to 700ms (0.7 seconds) of length – that is how long it takes me in average to speek a number. The script also filtered out to long, or to short snippets (yellow and blue) or added additional noise, if the snippet is to short (green). My samples where at 16000, 16bit signed PCM, little Endian.
Lesson 1: Trainingdata must be really correct and well labeled, the context of the data needs to be understood. It needs to cover a great variety. Don’t be so optimistic, what the model does not see during training – will be less likely to be recognized.
2 – Feature Generation
This was the hardest lesson – the most complex part is not to train the model, its to prepare the features. The feature is basically the data that is directly input into the model – as set of numeric values of a constant length and the label. The features that you generated must fit to the model, its a bit like pointing the algorithm already towards the solution – put the data on a golden-plate. For voice recognition its recommend to use a CNN (convolutional neural network) .
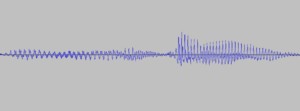
But this network wants to have an image as input – so how to get an image from a wave file (.wav) – well you make a image out of the wave file. As you see, I already did above – so I could use that pictures and load the binaries (color codes) of that picture into the model. The model would learn the characteristics of the picture and find the right number (…in theory). But remember the “golden plate” – there is a much better way to represent sound -that is called a MEL-Diagram.
You can Google it, but in a nutshell – you don’t look at the wave of your voice, but at the frequency (y-scale) of your voice over time (x-scale) using a Fourier Transformation. Its called MEL-Diagramm, because the frequency is scaled in aligned to the sensitivity of our ears. Comparing below pictures, maybe you can already sense the relation between both and that the 2nd one (MEL) is easier to interpret.
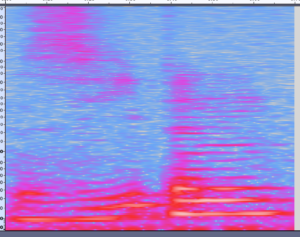
The tricky part of the feature generation is to find the right parameters, above picture has a high resolution, that means a lot of pixels. So – too many pixels for a small ESP32 edge device.
Solution: There are some parameters in the MEL function, that reduce the amount of frequency buckets (less points in y – axes) or increases the sampling frequency (less measurement points over time – less points on x-axes) . So you need to paly around with the Fourier transformation parameters and get a feeling (or trust the preset). This was done in Edge Impulse, you see a screenshot below.

Some mathematics – to show you how it goes: We are doing 16khz sampling, that means 16000 measurements (values) per second. That is to much for our ESP, so the frequency will be averaged in blocks of 20ms, that results in 32 values per 650ms (I took 30). For the Fourier Transformation we selected 17 coefficients (that means 17 values describe the frequency) , so every 20ms we get 17 values (it relates to a pixel in the y-axes in above picture). 17*30=510 – its that easy. Our model has to process 510 datapoints for each 650ms of sound. As you can see Feature-Design = Data Reduction, while preserving the essential information.
Each data point represents a float number, that is to difficult for an edge devices. Thanks to Tensorflow Light it is able to convert this float numbers into 8bit integer – something small devices can really well handle.
So..after all that work, we have many, many wave files, converted into features of 510 bytes, ready to load into our model for training
2. Model Design and Training
As mentioned for image processing a CNN (Convolutional Neural Network) is a good choice. Google for “cnn ml tutorial” for really good explanation. I give you my personal, non scientific, non approved version -its my personal view that helped me to understand:
The Model
A CNN network processes the image in steps (layers), each layer is extracting characteristics from that image and reduces the size of that image (nice explanation). At the end the size is reduced to a degree that is mapping your output-channels, so in my example it reduced from 510 values to 12 channels (zero to nine + yes and now).
Below you can see the network I used, its described in “KERAS” – a language to define and run ML models, lets see line by line:
model = Sequential()
model.add(Reshape((int(input_length / 17), 17), input_shape=(input_length, )))
model.add(Conv1D(14, kernel_size=3, activation='relu', padding='same',trainable=True))
model.add(MaxPooling1D(pool_size=2, strides=2, padding='same'))
model.add(Conv1D(25, kernel_size=3, activation='relu', padding='same',trainable=True))
model.add(MaxPooling1D(pool_size=2, strides=2, padding='same'))
model.add(Flatten())
model.add(Dense(classes, activation='softmax', name='y_pred'))
What do this lines actually mean – not to dive into Keras, but I guess you still see the concept:
- “Reshape” – you notice “17” – the number of frequency buckets, of course you need to tell the network the dimension of your image.
- “Conv1d” – the first level for the extraction of characteristics
- MaxPooling” – reduce the size of the image
- “Conv1d” – again reduce the level of characteristics
- Flatten and Dense:get the value down to the output of 12 labels
The Training
Each layer of this models has a lot of parameters (e.g. defined by the “14” and “25”) and filters (kernel_size, pool_size) that describe how the characteristics will be extracted.
So, on training you feed all our sample features into the mode and play around with the parameters until the forecast (last layer) gives you the right values. You need to play – around run the training “over and over” again until your model gets a good precision, e.g. it is able to predict 98% of your example data correctly.
Machine Learning (for the sake of understanding) this is more or less the same as solving a equation. When the forecast results is good enough, you have minimized the error of this equation by training or playing around with the model parameters.
The different layers of your model filter the characteristics of your input values feature down to the output layer ,where it shows the most likely result (to describe a CNN model, other model have a different principle – but still, its an equation).
I would not necessarily name this “Artificial Intelligence”. To be fair, there are other ways of machine learning, when you let different algorithm play against each other- so they improve themselves, or reinforcement learning, where “intelligent agents” are motivated to solve a problem by getting a reward. Finally all this can be inspired by biological evolution – so maybe in the future we will have “intelligence”.
Overfitting – the big training challenge
Training uses different types of data:
- Training Data: This data is used to determine the parameters of the mode, by minimizing the error against the result
- Validation Data: This data is used during training, to see how well the model performs and to do further tuning
- Test Data: New data, that was never “seen” by the mode – to test its real world performance
- Production Data (this is my invention): The data the model really gets when installed on the edge-device “real live data”. I needed to learn, that there is always a slight difference between the data, in reality the model performs always a bit worst than in the training.
Imagine: If you have a model with 100 parameters to train, and you have 10 sets of training-data with 10 features. You model has 100 variables(parameters) to store 100 (10*10) training combination. In this scenario, you model must not necessary learn -it just needs to remember and assign 1 input combination = 1 output. Or below model that tries to split between blue and red, its getting a 100% fit for the training data, but you can imagine it will not run well on real production data.
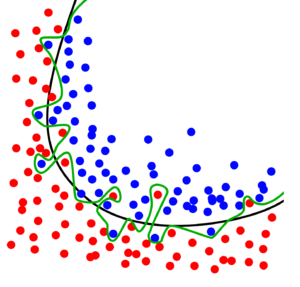
Overfitting is a big risk, because you cant look into your model – and you can not be sure what characteristics the model is used to filter, just the color of this one pixel? Another risk is very similar – you think your model is using the right characteristics, but its looking at something completely different. (e.g. a model that should recognize faces and just detects glasses (due to not balanced training data). On my voice data I realized that it was considering the length of the sound snippet as important – so when you speak slowly, not working.
There are some methods to overcame this – but (imagine hundreds of data-sources for financial forecast you want to rely on) – how to really be sure your model is looking at the right things? I believe its like statistics, only trust your own or the model you know (at least the data it was trained with) 🙂
Overfitting – how to prevent?
Again, this part is not scientism – just some ideas I implemented on my solution. Its important to say, that you can just skip this when working with EdgeImpulse and just stick to the proposed values. But come on, that is to easy. To do below, I rebuild the model using python on my local PC (all code is listed below on GitHub)
- Take a lot of training data (this is really the most simple and effective one)
- Add noise and variance to your training data (e.g. shift some snippets, make them shorter, longer, for pictures you can swap, rotate, brighten….)
- Check you size of your model and make it as small as possible (I worked with Hyperparameters) until my model got a good size, a small model with limited parameters also runs much faster on the edge device, and timing is everything
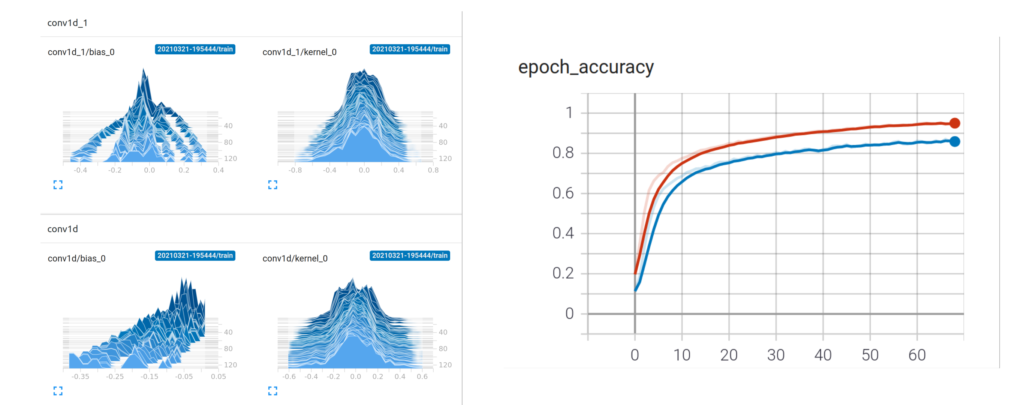
- Last, but not least – look into the model using Tensorboard: Below the four small pics show the change of the model variables of the different layers (x/y axes) over time during training (epochs). Initially (at the back on z-axes) all training variable are evenly distributed (initialized with random values) – over time you see them spreading out and getting different values – the model is learning. On the “epoch_accuracy” you see how the model is getting better over time (1=100% correct)
Transfer Learning
Another kind of overfitting also may occur, if only train the system with my own voice – it my get used to characteristics of my voice I may not even dream of, breathing, making a break, having a cold – of course that would reduce the robustness of my model.
So my thinking was to initially train the model with a wider speech set (many numbers spoken by different people – I used the https://commonvoice.mozilla.org/en). After several rounds of training and once the parameters have been settled (meaning the parameters of the model are somewhere settled and the model is working ) I would transfer this pre-trained model and continue a 2nd round of training with my voice only. In this 2nd round I used a very small step rate – so the model only change in very small baby steps, keeping the core characteristics of the original training.
There are other way to do this, e.g. just mix my own voice recording with a more mixed speech set of several speakers and put them all in one common training round. I am assuming, that I would need a lot samples from my speech to have enough impact and get it “tuned” to my voice. So the advantage of the scenario “transfer learning” I used is, that in the 2nd round of training I can exactly control via the step-rate and training-round how much impact my “voice” has in compared with the wider sample. I think its called “transfer learning”, as I transfer the knowledge of one more generic model into a more specific model.
How to do it with EdgeImpulse
To do this with EdgeImpulse I trained the model-1 with “commonvoice” on my local laptop until I got reasonable results (don’t expect good performance from an ESP32 with such a limited neural network). Once ready, I took the trained model-1 (exported via Tensorflow in a specific “h5” format that includes all model parameters) and pasted this into the EdgeImpule model-2 as “starting weights”. The training and deployment follows the normal process.
# Done on the local PC with the trained model-1 from Commonvoice-Mozilla
rd= open(SOURCE_H5_MODEL,'rb').read()
rd_64 = base64.b64encode(rd)
h5_model_str=rd_64.decode("UTF-8")

# Done on EdgeImpulse on the classifier page (setting to "Expert Mode")to train model-2
import tensorflow as tf
import base64
import h5py
from tensorflow.keras.models import Sequential
from tensorflow.keras.layers import Dense, InputLayer, Dropout, Conv1D, Conv2D, Flatten, Reshape, MaxPooling1D, MaxPooling2D, BatchNormalization
from tensorflow.keras.optimizers import Adam
sys.path.append('./resources/libraries')
import ei_tensorflow.training

model_weights_str='iUhERg0KGgoAAAAAAAgIAAQAEAAAAAAAAAAAAAAAAAD//////////5iUAAAAAAA...... # <-------- here I pasted the content of the h5_model_str

# from utf-8 back to binary
model_weights_b64=model_weights_str.encode('utf-8')
model_weights=base64.b64decode(model_weights_b64)
f = open("model_v3.h5", "wb")
f. write(model_weights)
f.close()


# model architecture
model = Sequential()
model.add(Reshape((int(input_length / 17), 17), input_shape=(input_length, )))
model.add(Conv1D(14, kernel_size=3, activation='relu', padding='same',trainable=True))
model.add(MaxPooling1D(pool_size=2, strides=2, padding='same'))
model.add(Dropout(0.25))
model.add(Conv1D(25, kernel_size=3, activation='relu', padding='same',trainable=True))
model.add(MaxPooling1D(pool_size=2, strides=2, padding='same'))
model.add(Dropout(0.25))
model.add(Flatten())
model.add(Dense(classes, activation='softmax', name='y_pred'))
model.load_weights('model_v3.h5') # here the parameter of model-1 are loaded as initializing values for model-2
Some words to conclude
Honestly – that was a tough exercise to make the ESP32 understanding in total 12 words – especially as in the German language many numbers sound really similar “eins, zwei, drei” or “null, neun, nein” . And the only way I managed to do this, was to really restrict the learning to my voice, its really listening only to me (also kind of cool). Also, it needs to be silent – I did not build in an “unknown noise” dataset to improve classifying “unknown” sound.
A lot of experimentation was needed to determine to optimal model dimension (number of layers, neurons). In addition the timing is extremely important – how long is the snipped recorded? Is it long, I can speak very slowly, but the ESP32 has to process more data – and gets time-out.
An absolute amazing goody from EdgeImpulse is the source code of the “inferencing SDK”: DSP Python Scripts by EdgeImpulse as Python script. This allows training you your local PC by using Python and to transfer the model to ESP32 – having the same feature extracting running with C. Features build in Python looks exactly as on the ESP32 (I checked it).
I do not feel like publishing my Python scripts collection – its really a bit messy and got bigger over time. But you can see the result in action with my voice controlled eInk alarm clock: Goodwatch