Goodwatch – The eInk Alarm Clock that listens to my voice – cloudfree and running on battery for months!
I built already the MCW – an eInk alarm clock running on an Arduino Pro Mini – and got fascinated by the great look and power-saving of eInk papers. One issue I could not solve really efficient was alarm programming. Always many buttons… so I want to have my clock understanding me – my words in German: Numbers zero to nine and the words “yes=ja” and “no=nein”.
One easy option would be to build in a microphone and let the watch connect to Googles SpeechToText API – getting the text back – and set-up the alarm. But really, who wants to have a direct connection from his sleeping room into the cloud. I could also just use Alexa – not my style.
So, I started 3 projects:
- Teach an ESP32 microcontroller to understand my voice: Edge AI – Embedded Machine Learning
- Build a really smart ePaper/eInk watch without “button” – using voice, movement and light for control,
- !!!!! NEW NEW !!! Use a Syntiant NDP 101 for speech recognition https://44-2.de/syntiant-ndp-101—always-on-low-power-speech-recognition/

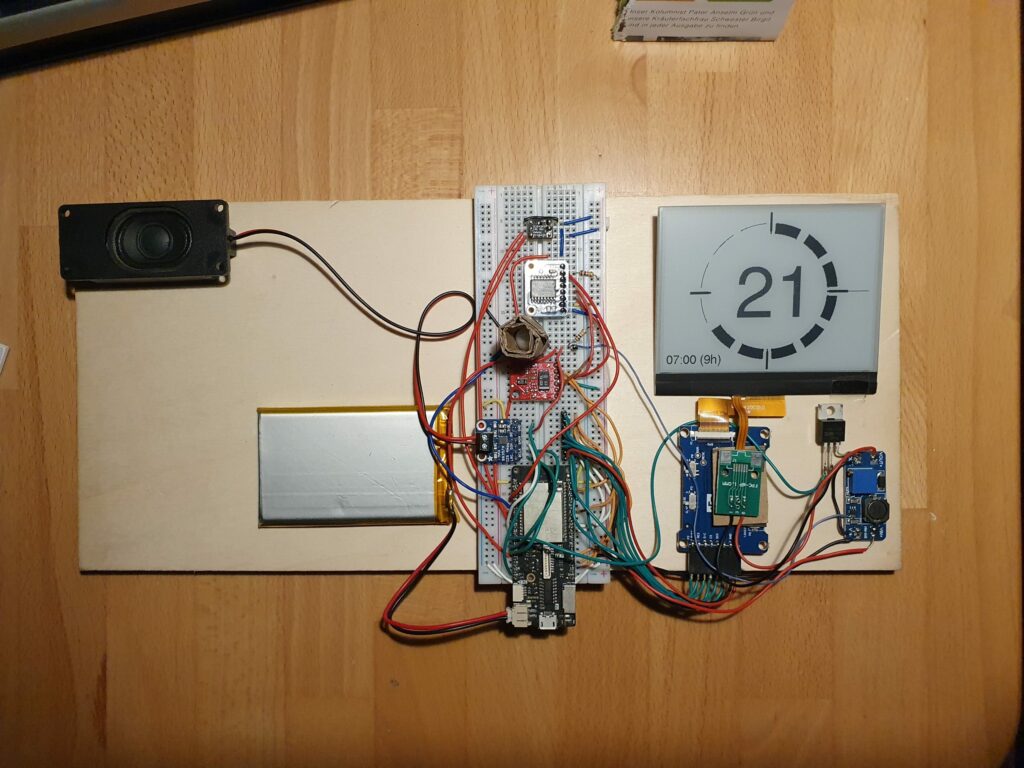
Hardware…Hardware…Hardware……
The key to success – is picking the right hardware – that was a good lessons learned from my last project. Here is my pick:
eInk Display
- Good Display – E-ink epd display 4.2 inch e-ink raspberry GDEW042T2
The eInk display supports partial refresh and communication via I2C bus – important not to use to many IO pins from the ESP32. - DESPI-C02 – a little board to connect the e-Paper with the ESP32 (no connection for power to the FrontLight Panel) and DESPI-C03 (with connection). Caution: The DESPI-C03 allows also to plugin the both FFC cables for the display and the front-light. If you think you can power-both at the same time, you kill your display
eInk FrontLight
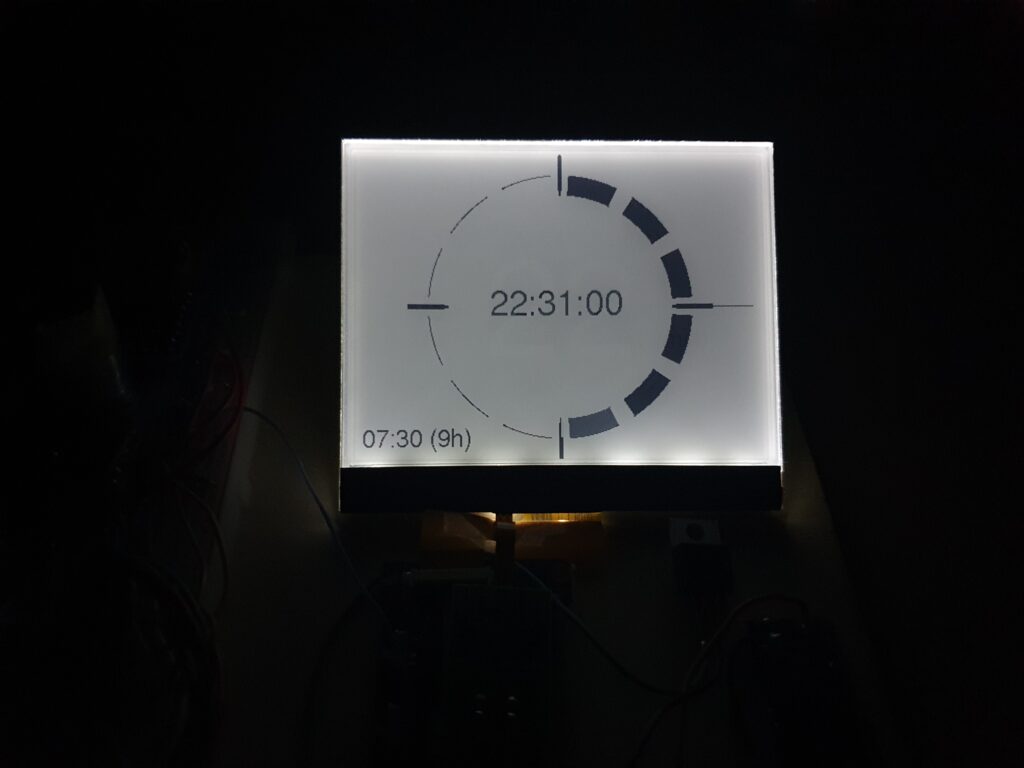
If you want to read the time and night – you need light. With eInk that is a bit complicated, you need a special front-light. Its basically a piece of glass with LEDs at the edge. I was thinking to build it by myself. But I think buying it, was a much better idea. Still getting the result I wanted was a bit more complicated:
- Good Display – FrontLight Pannel <- these are the trick and I think it just looks cool at night The FrontLight must be an exact fit to the display. I had quite some emails with Good Display to select this combination and I was very surprised by their great customer service. At the end it came direct from China 🙂
- FFC Adapter RM 2.54 to connect the FrontLight Pannel with the power support (see above)
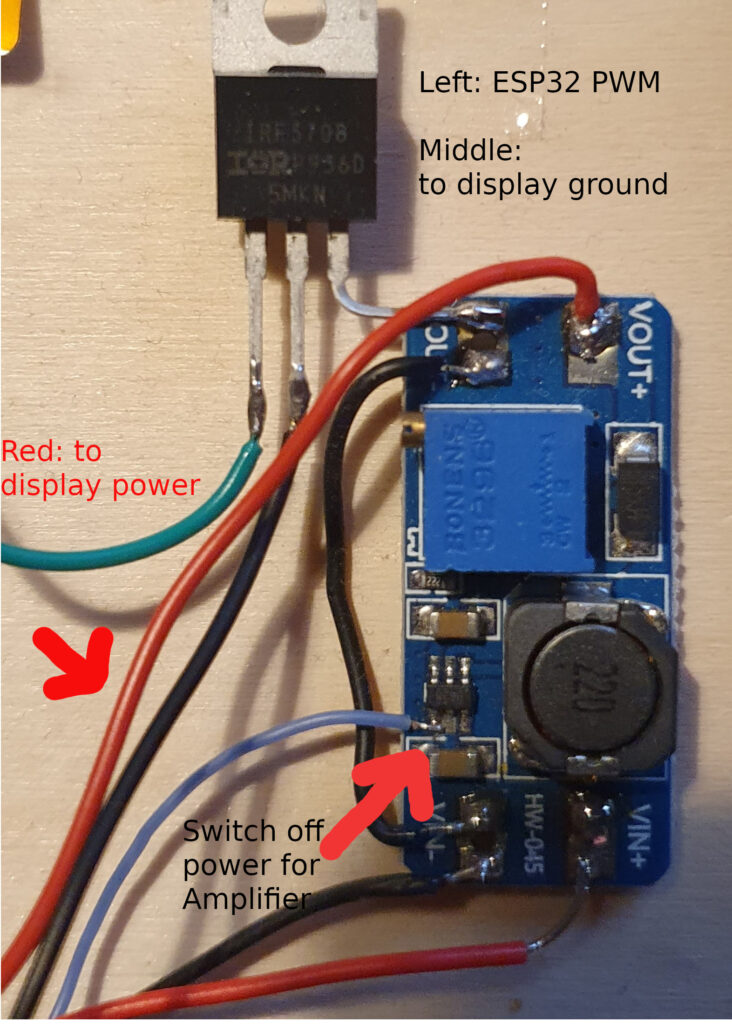
- HW-045 DC-DC boost voltage regulator: The FrontLigh Pannel has 7 LEDs of 200 Ohm in series , if they need 15mA to shine – you need 21V. Uups – one more device needed, a power booster.
- IRF3708 Transistor N-MOSFET 30V 62A 87W TO220AB – dimming the front-light, of course it needs to adjust to outside light condition. A first idea to use PWM as input for the voltage regulator was a bit naive, so the ESP32 is using the MOSFET to PWM the output of the voltage regulator before powering the display. To keep it running on battery for a long time, each part of hardware needs to be in low power consumption mode when the ESP32 is on sleep. For the amplifier I found the following solution, watch the tiny blue cable – that pulls the amplifier into deep sleep mode also:
- MAX98357A
Additional Hardware and Sensor
Here comes the rest, I had to do several rounds until I found the best pick – but I am really happy with below selection:
- ESP32 as https://www.wemos.cc/en/latest/d32/d32_pro.html. (320kb RAM, 4MP PSRAM, 16MB Flash). Two very important things, my one had 16MB Flash (program code, SPIFF), what is great to have when you want to work with Machine Learning and do some more fancy stuff, build in LIPO charger and 4MB PSRAM (that is also needed by the sound library and for ML)
- Adafruit DS3231 – Precision Clock: An alarm clock needs time and alarms, both can be done the DS3231- supported by a little battery, so time and alarms can survive a short power outage. I finally picked the more expensive version from Adafruit, as two much cheaper versions from the internet just kept running to fast – approx 10s per day – no option 🙂 The DS3231 triggers and interrupt every 5min to show the time and of course when there is an alarm.
- CS43434 I2S Digital Microphone – there are several different microphones on the market, I tried them all. At least for that one, I can say its compatible with the ESP32 I2S bus and really records in good quality. My one I got over Tindie.
- PIR HC-SR602 Infrarot sensor: You can see in the video that I disable the alarm with a movement of my hand over the clock, that is a PIR sensor. Amazing – super, super low power consumption and so sensitive. The PIR sensor triggers and interrupt on the ESP32 for wake-up.
- Adafruit I2S 3W Class D Amplifier Breakout – MAX98357A: It needs to play a nice sound when waking up, and the ESP32 has enough computing power to even decode MP3 files or stream from a radio station. Also this section is on hardware – https://github.com/schreibfaul1/ESP32-audioI2S to get sound into the alarm clock with 5 lines of code.
- APDS-9960 – Digital Proximity, Ambient Light, RGB and Gesture Sensor: I wanted to use gestures to wake-up the alarm clock and decide between different operating modes. The APDS-9960 is really smart, it detects different hand-moves and measures distance. In addition it can check the light strength and color. I spent a lot of time, but its still consuming a lot of power also in low-energy mode. The only way to use this efficient: Let the PIR sensor (see above) run always – and then start the measurement. Unfortunately this causes a delay in processing – here we come to my next project: Wake up with my voice.
Software
Initially I have been using Arduino Platform to build this project. This platform includes a pre-compiled set of the ESP IDF. The ESP-IDF is Espressif’s official IoT Development Framework for the ESP32. As a consequence any settings used to compile the ESP IDF are fixed and can not be changed.
Boot-Speed is King
When waking up the Goodwatch, I want to see quick reaction – but noticed a 1-2 second break before the ESP32 got active. The ESP is using this time to validate the Flash and RAM. As the Wemos D1 Pro has 4MP PSRAM and 16MB Flash – this takes a while.With a change in the compiler-options, this check could be disabled.
Arduino as a Component
The trick is to install Arduino as a component to the main framework used for compilation is the ESP IDF and it includes the Arduino libraries as a subfolder. This provides access to an utility “menueconfig”, that generates a config file, e.g. sdkconfig.lolin_d32_pro.The problem is, that Arduino and ESP-IDF use different build-tool. After a lot of research I managed to get this working. Speed is KING again, I would say less then 500ms to react on eInk is good.The source code can be found here. I have put some comments in the platformio.ini on the build.It’s all on Github: https://github.com/happychriss/GoodWatch_espidf
Thinking in Circles…
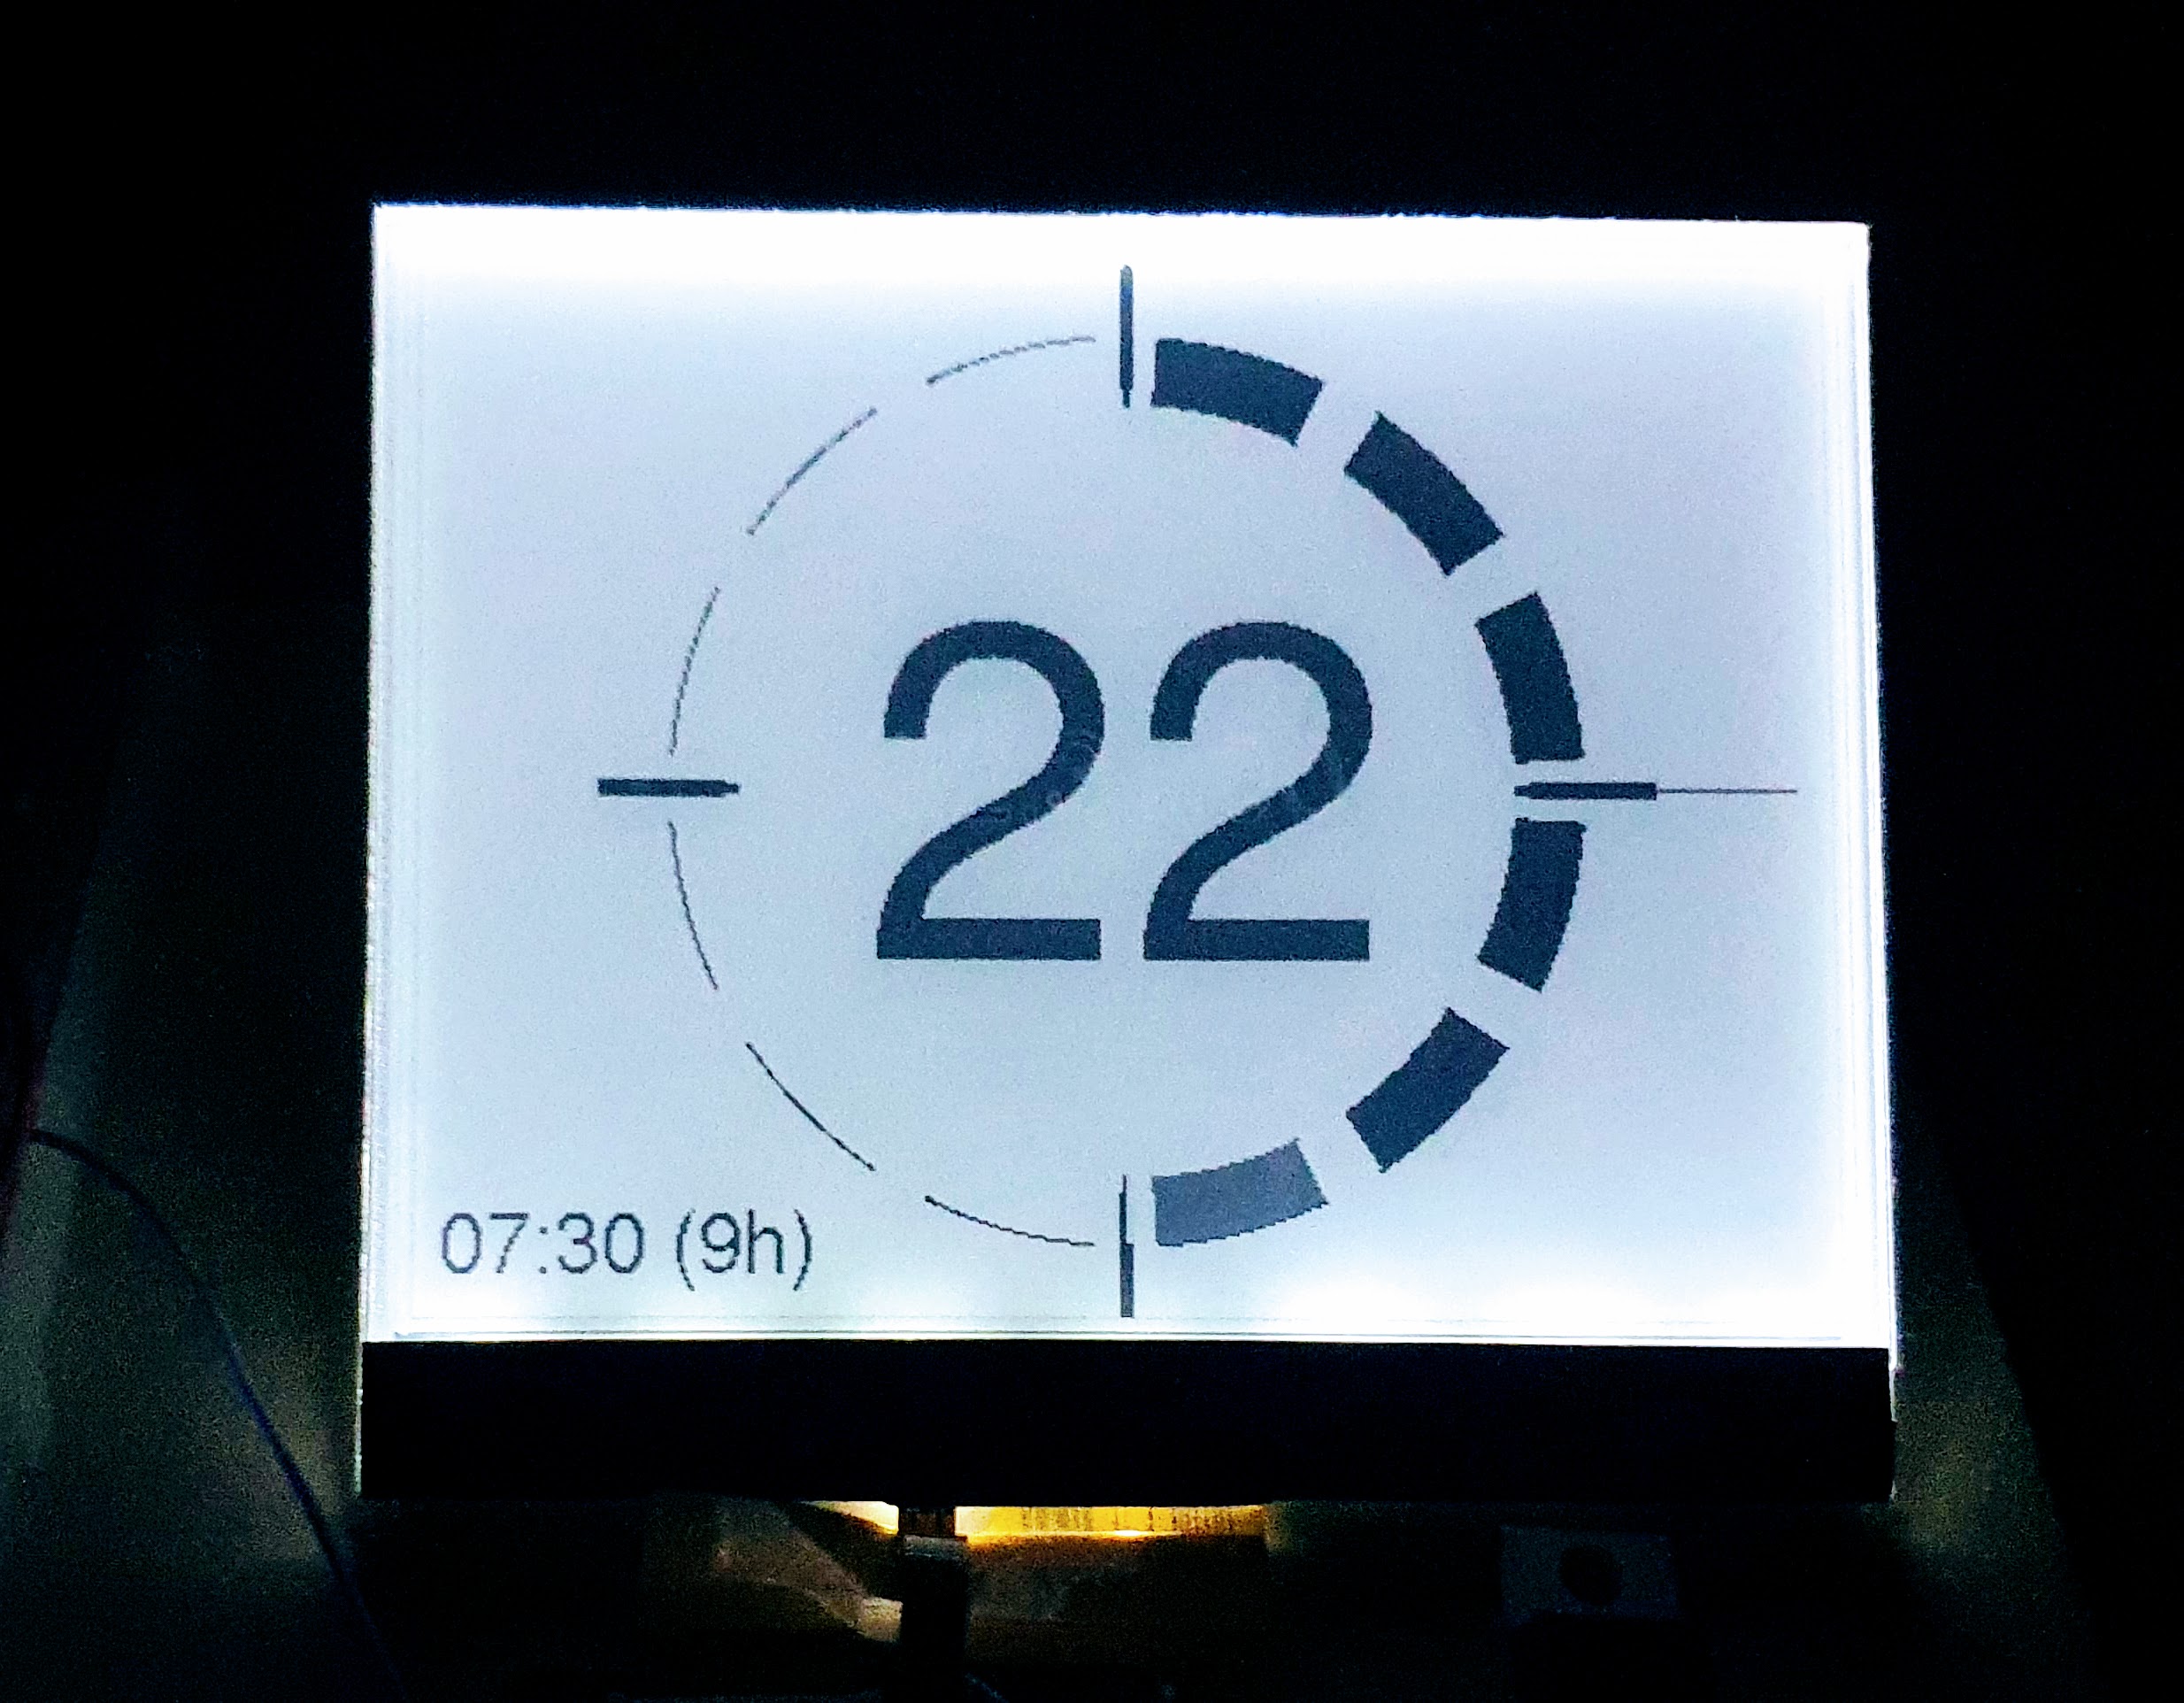
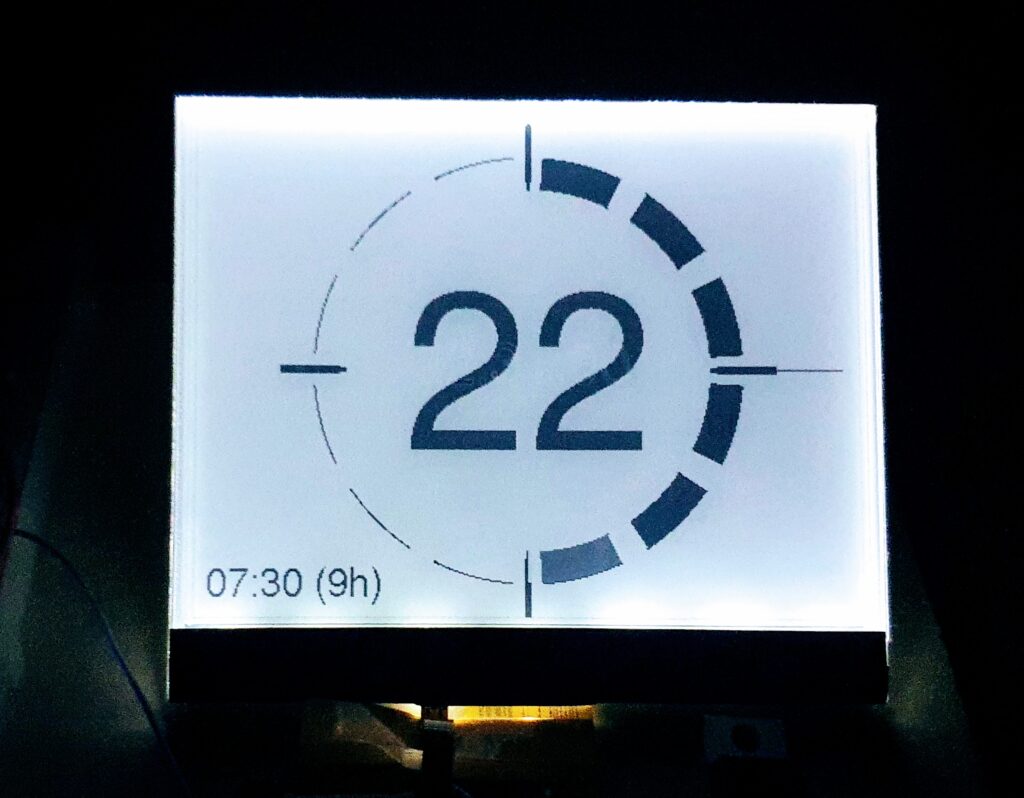
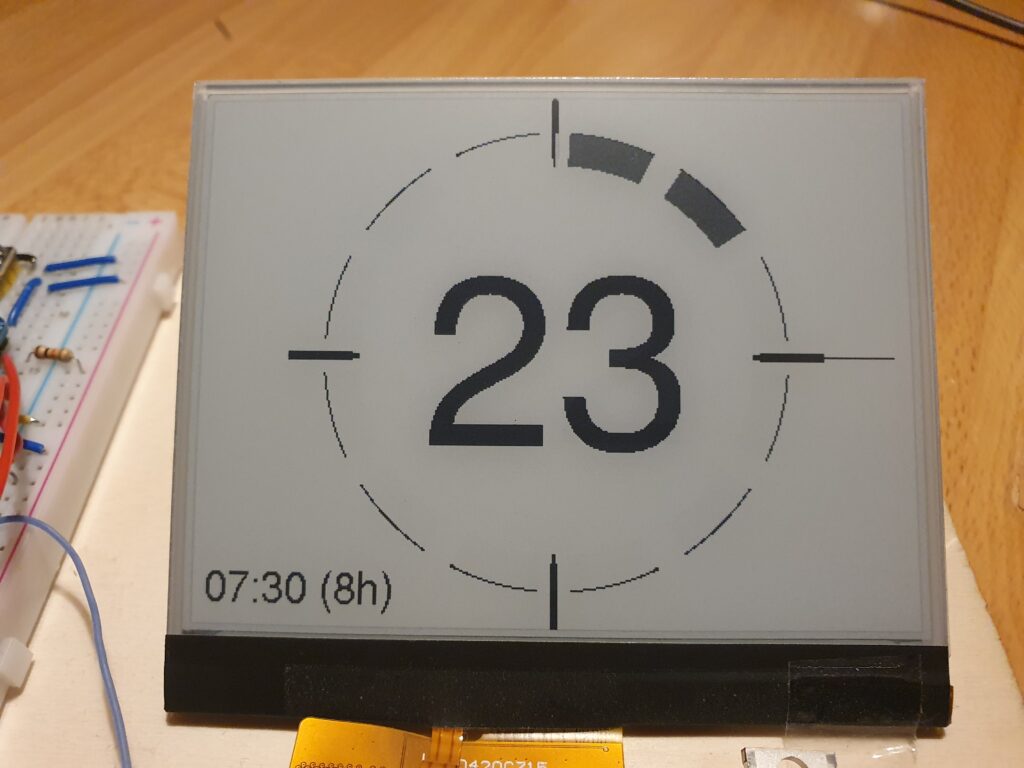
I had some fun on painting the circle-arcs – that brought me back some memories from school with my friends “sinus” and “cosinus”. I am sure there is much more elegant solution – but at one point of time, I was just happy to see the circles. In total I think I found a quite efficient way. Look as this “naughty” peace of code to paint an arc – and the painting:
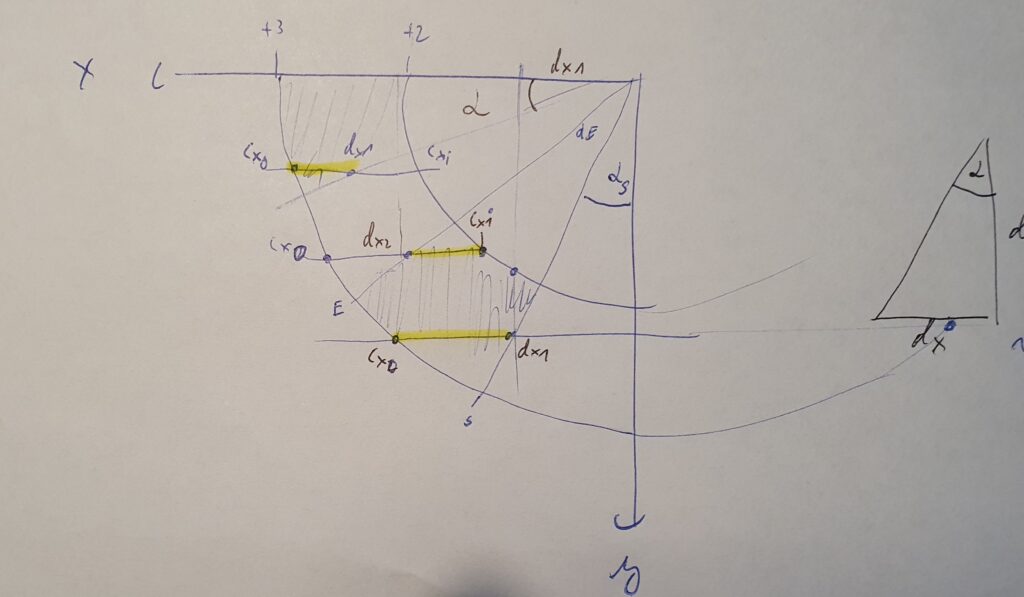
void DrawArcCircle_Q3(GxEPD2_GFX &my_display, st_pwin *pwin, int x0, int y0, double start_angle, double end_angle, int ri, int ro) {

    start_angle = (270 - start_angle) * (M_PI / 180);
    end_angle = (270 - end_angle) * (M_PI / 180);
    double tan_start_angel = tan(start_angle);
    double tan_end_angel = tan(end_angle);

    int ri2 = ri * ri;
    int ro2 = ro * ro;
    for (int cy = 0; cy <= ro; cy++) {
        int cx_i;
        if (abs(ri) < abs(cy)) {
            cx_i = -1;
        } else {
            cx_i = (int) (sqrt(ri2 - cy * cy) + 0.5);
        }
        int cx_o = (int) (sqrt(ro2 - cy * cy) + 0.5);
        int cyy = cy + y0;

        int dx_1 = cy / tan_end_angel;
        int dx_2 = cy / tan_start_angel;

        if (dx_1 < cx_o) { cx_o = dx_1; };
        if (dx_2 > cx_i) { cx_i = dx_2; };

        if (cx_i <= cx_o) {
            gfx_line(my_display, pwin, x0 - cx_i, cyy, x0 - cx_o, cyy);
        }

    }
}
Time takes Time – and calculating with days and months – even more
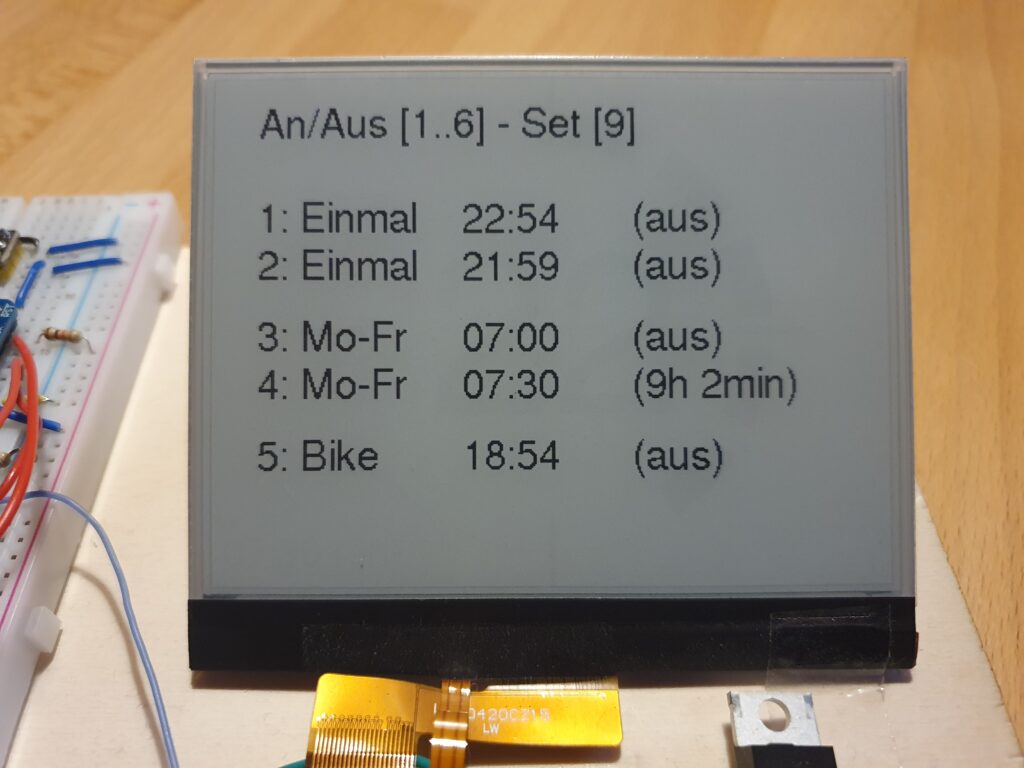
Another simple topic – that got me some time to get it right: Calculating with time. My alarm watch has 5 different wake-up alarms, the DS3231 can manage 2 alarms and create an interrupt signal to wake-up the ESP32. One alarm is gone for a wake-up every 5 minutes to paint a new arc. The other one needs to be updated on time – so, you need to sort the alarms to find out the next possible. Now you have alarms on weekdays and on weekend, repeating alarms and one-time alarms – you get the message…..I am not proud of my code here – but sorting was easy at the end.
struct strct_alarm {
    uint8_t i =0;
    bool active = {false};
    bool valid = {false};
    DateTime time;
};

int SortTimes(void const *a, void const *b) {
    const struct strct_alarm *ad = (struct strct_alarm *) a;
    const struct strct_alarm *bd = (struct strct_alarm *) b;
    return (int) (ad->time.secondstime() - bd->time.secondstime());
}

// Calling the qsort
qsort(rtcData.d.alarms, ALARM_NUMBERS_DISPLAY, sizeof(strct_alarm), SortTimes);
Flash – Keep the Memory
The alarm times need to be stored on the ESP32 and should survive a power-outage (similar to the time of the clock). The ESP32 has FLASH memory available, perfect – all what I needed. After fiddling around with CRC values to check if the data in the flash is valid and addresses..I learned about an ESP32 feature called “NVS” on the ESP Documentation. – where it got really easy. It even checks, if the flash is consistent.
   esp_err_t err = nvs_flash_init();
    if (err == ESP_ERR_NVS_NO_FREE_PAGES || err == ESP_ERR_NVS_NEW_VERSION_FOUND) {
        // NVS partition was truncated and needs to be erased Retry nvs_flash_init
        ESP_ERROR_CHECK(nvs_flash_erase());
        err = nvs_flash_init();
    }
    ESP_ERROR_CHECK( err );

// Write:
       err = nvs_open(STORAGE_NAMESPACE, NVS_READWRITE, &my_handle);
        size_t required_size = sizeof(d);
        if (err != ESP_OK) DPL("NVS_OPEN ERROR");
        err = nvs_set_blob(my_handle, STORAGE_NAMESPACE, (uint8_t *) &d, required_size);
        if (err != ESP_OK) DPL("NVS_WRITE ERROR");
        // Commit
        err = nvs_commit(my_handle);
        if (err != ESP_OK) DPL("NVS Commit Error");

// Read:
       err = nvs_get_blob(my_handle, STORAGE_NAMESPACE, (uint8_t *) this, &required_size);
        if (err != ESP_OK && err != ESP_ERR_NVS_NOT_FOUND) {
            DPL("NVS READ ERROR");
        }
Programming the eInk Display
This would have been the most complicated, but thanks to: https://github.com/ZinggJM/GxEPD2 it was really easy. It was a bit of work to find this library and to get the concept. There is also a support-forum and the author is really helpfull. THANK YOU.
Its worth to note that the display is connected to the ESP32 via a simple adapter DESPI-C02 or DESPI-C023 using an FCC cable, from here its connected to the ESP. Most reasons for error is the wiring and correct association of the PINS – and I mixed up MISO and MOSI — took my so long 🙂
// From my hardware
// EPD Pins - GxEPD2_display_selection_new_style.h using SPI
// EPD Pins****
// CS=5, DC=0, RST=2,BUSY=15;
// SPI: SCK=18, SDI=MISO=23
// BUSY -> 15, RST -> 2, DC -> 0, CS -> 5, CLK -> SCK(18), DIN -> MOSI(23), GND -> GND, 3.3V -> 3.3V

#define EPD_CS 5 // Chip Select -
#define EPD_DC 0
#define EPD_RST 2
#define EPD_BUSY 15

GxEPD2_DISPLAY_CLASS<GxEPD2_DRIVER_CLASS, MAX_HEIGHT(GxEPD2_DRIVER_CLASS)>
display(GxEPD2_DRIVER_CLASS(/*CS=5*/ EPD_CS, /*DC=*/ EPD_DC, /*RST=*/ EPD_RST, /*BUSY=*/ EPD_BUSY));