Last Updated 1 year by cneuhaus
I love taking photos, its a way for me to keep the memory fresh and to be thankful for the good times in live.
Since the very beginning I used Picasa to sort my photos. When Google stopped that service, I moved to Google Photos – since then I have hundreds of albums, that allow me to browse through my life.
I love all the features, from sharing, organizing, automatic synchronization and much more…. until I tried to download an album and checked for EXIF information on GPS and date and time…. and…. YES:

LOCKED IN THE CLOUD: As more I tried as more I got frustrated.. until I learned in a forum that this is not a defect, but strategy: You please keep your photos @ Google, so you are stuck with this service, pay money for cloud storage and ..just be with Google forever.
Yest – that can be fine, unless you start thinking what Google may do with Google Fotos, maybe “say goodbys”, limit the storage, share your data – you just don’t have control.
That was the reason why this happened:
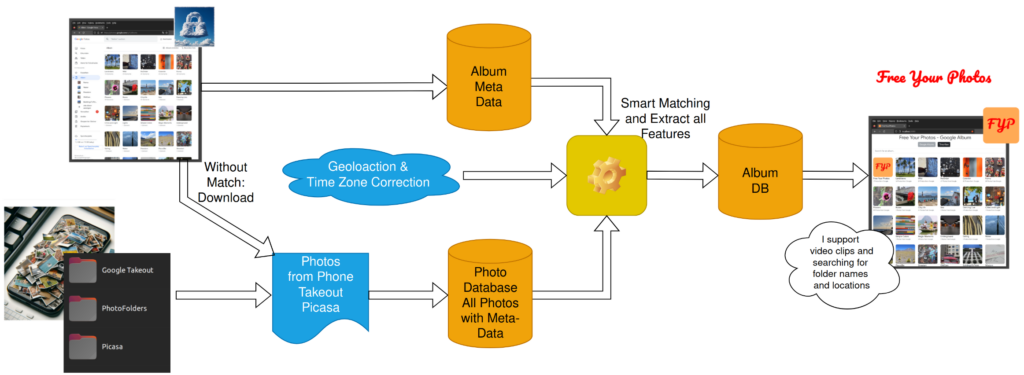
Solution Overview
Source Code: https://github.com/happychriss/FreeYourPhotos
Problem: Dependency on Google and Cloud Services
- Long-term use of Picasa and Google Photos for storing and organizing pictures
- Risk of services closing down (e.g., Picasa)
- Additional costs for cloud storage
- Inability to retrieve all information from Google (e.g., geolocation)
- Google Photo API limitations (cannot access original data and geo-information)
Solution: Python Scripts and a Web App

Python Scripts
- Download album structure and all photos from Google Photos
- Utilize original data stored on mobile phones, PC folders, or extracted from Google Takeout
- Retrieve all geo and date information for better ownership of data
- Integrate photos from your own folder and archives for a consistent look
Web App
- Similar functionality to Google Photos,
- Shows Photos and Videos
- Photos with Location & Map
- Search by place and title
- One tool for all sources, includes Takeout, Picasa (with favorites) and Folders – displaying in Timeline Mode -in right order
Benefits
- Independence from Google and cloud services
- Avoid additional costs for cloud storage
- Ownership and control over your data
- Combine multiple photo sources for a consistent experience
Software Stack & Dependencies
- Python
- Flask (Webserver)
- PostgreSQL
- Docker
- Google APIs:
- Cloud API to connect to Google Photos (API Key needed) ,
- Geolocation API to convert geocordinates to location information (search by location)
- Time API to convert Location to Timezone, to correct time zone (that Google took away)
- Google MAPs to display location on Photo Detail Page
Next Steps
You like it, you want to help. Contact me, via Github or LinkedIn, see About Me
Latest News
 How I Secured My Local Server: Ditching VPNs for a Smarter Cloudflare Solution (25.10.2024)
Last Updated 1 year by cneuhaus
A few hours back, I had a straightforward problem: I needed to access my local server securely from the internet without opening it up to unwanted access.
What triggered this need was my own app Free Your Photos – that gets you out of the Google Photo Cloud and hosts your photos on a local server – YOU OWN THEM. Now with this solution I can show my photos on any PC – even without a VPN.
My first instinct was to use a VPN – but this would require a VPN installed on the “browser side”, so I would not be able to access my page from any other computer or phone.
But – what about accessing my local-server from EVERYWHERE without any VPN setup – but still having security?
That’s when I stumbled on the idea of using a reverse proxy with multi-factor authentication (MFA). Instead of opening the whole network like a VPN, a reverse proxy could act as a gatekeeper, allowing access only to the server itself and only to authorized users. I set it up to require Google Authenticator, so even if someone got to the login screen, they’d need a time-based code to get through.
ChatGPT gives a pretty good instructions for all the steps that worked right away for HTTP. But to get HTTPS working I needed some fine-tuning:
My configuration: Using Pything with Gunicorn and nginx on Ubuntu.
What I needed to do special:
Domain Registration
- Register a domain on Cloudflare
- Assure came record is your domain-name and pointing as target to your tunnel, e.g. “345234-1420-4c4e-b8e4-86f8a885ba7a.cfargotunnel.com”
- Download Origin – Certificates: SSL/TLS->Origin Server – that are used to authenticate the local server against Cloudflare, save them in a folder accessible by nginx web server.

Tunnel Configuration
ZeroTrust – Config => Network => Tunnels => Cloudflared
Type: https, URL: localhost:443
TSL: NO TLS Verify
Nginx Config
       listen 443 ssl http2;
       listen [::]:443 ssl http2;
       server_name <your domain name>;

        ssl_certificate /etc/ssl/certs/cloudflare_cert.pem;      # Path to your SSL certificate
        ssl_certificate_key /etc/ssl/certs/cloudflare_key.pem;  # Path to your private key

        location / {
            include proxy_params;
            proxy_pass http://unix:/home/cneuhaus/FreeYourPhotos/fyp.sock;
        }
    }
Google Authentification
Access should only be for myself, so I wanted to use Google as authentication provider. For simple steps ChatGPT again is your friend.
But I only wanted access for myself – otherwise everybody with google account can login, for this:
Zero Trust=>Settings=>Authentification=>Login Methods, enter App-ID and Client Secret.

Zero Trust=>Application (create new one) =>Policies=>Configure Rules=> add your full Gmail address here