

It all started with an article in my favourite computer magazine Heise – WLAN Plug with Tasmota. So I could control some 220V devices, like a floor lamp with my OpenHAB Super-Cheap – Smart Home Solution Smart Home.
Some 220V devices don’t need a plug, I want to control them with a tiny switch and not a big plug on the wall, here I found this- 4€ each from China…will this work?

After one month of waiting, 3 arrived. Looked actually quite good!
Its actually amazing, what you get for 4€, and ESP8266 micro computer with WiFi and all the hardware to control 220V / 10 A = 2200W)
But: Its firmware is from China, you need to register an account somewhere and the little switch will connect to it and send your data somewhere – I cannot control.
Wo we need to exchange the firmware on the switch, the brand “Sonoff” is well known for an “easy to way” to do this
The firmware solution of my choice is Tasmota, an OpenSource SW that connects the device only into the internal WiFi network and provide a user-interface to configure the device. So we need to do 2 things to get it running:
- Flash new Firmware flashed on the switch
- Integrate the switch into OpenHAB (smart home open source SW)
Preparation
Pretty easy thing (all here: Details), you need:
- Image “tasmota.bin” from Tasmota: https://github.com/arendst/Tasmota/releases
- Flashsoftware to reprogram the device with the image from 1): tasmotizer
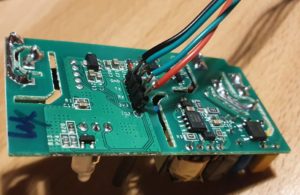
- A wire to to connect your PC via an FTDI (serial2USB converter) with the switch, the FTDI and the switch have signs on it, so has the switch:
FTDI Sonoff Smart Swtich 3V 3V GND GND TXT REC/RXI REC/RXI
TXT
It takes 5min of soldering, when ready it should look similar to below:

Flashing
The switch needs to be connected with the PC via our nice cable, it just works by putting it in and a bit of adjusting.
To get the switch in the “programming mode” the reset-button on the switch must be pressed *before* connecting the switch via USB cable to the PC. Once connected, you can release the reset-button (its the long black stick).

Then start flashing with tasmotizer by selecting the firmware and the USB interface:

After re-power the switch, it opens an access-point and you can be configured via connecting to its WiFi (some AP with “tasmota” in the name) , so it will later connect to your own WiFi. But much more elegant, you can use tasmotizer via the button “send config” to update the WiFi directly, you will need to enter the credentials (SSID and PWD from your home network).
All your credentials and data remain will remain in your network now. On the router I also disabled the internect-connection for the IP address of the switch in my home network – just to be save 🙂
Configure the Switch – Tasmota is great
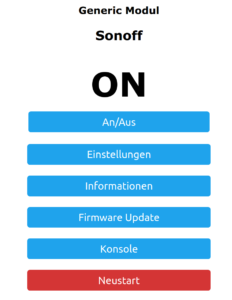
When all works, the switch will connect to your home WiFi, you can find its IP address in your Router and you can open its main config page via a web-browser. You will see the new firmware from “Tasmota” active, that gives you full control over the device.
Its an amazing software, full Opensource, not cloud connection or internet needed. It stays in you home 🙂
The basic tasmota configuration is already correct, nothing to do, maybe in the settings section, you may enter a backup WiFi address – if you want.
Connecting to OpenHAB
The Switch Side
The concept is, that the switch will use the MQTT protocol to communicate with OpenHab, once configured the switch will listen for a message via this protocol and do its job – ON/OFF.

To configure MQTT you need configure your OpenHab server IP and the credentials of the MQTT network, that you have configured in OpenHab. The trick is the “topic”, that is the “address” that the switch will listen towards – any message with this topic will be processed by the switch. For my network I gave each switch its own topic, like “sonoff1”, “sonoff2” – so I can control them separately. OpenHab has a binding that keeps the link to this protocol and its easy to configure.
The OpenHab Side
After installing the MQTT Binding in OpenHab, I did the following configuration, important to have the topic “sonoff1” correctly everywhere:
Bridge mqtt:broker:OH2mqtt "MQTT Broker" @ "MQTT" [
    host="192.168.1.106",
    port=1883,
    username="OpenHAB",
    password="xyz"

] {
    Thing topic sonoff1 "Sonoff1" @ "MQTT" {
     Channels:
     Type switch : ch1  "Light1" [ stateTopic="sonoff:stat/sonoff1/POWER", commandTopic="cmnd/sonoff1/POWER" ]
    }
}
To enable and disable the switch, its straight forward:
Switch Sonoff1 "Light1"  	 	 	 	 	 	 	 	<light> ["Switchable"] { channel="mqtt:topic:OH2mqtt:sonoff1:ch1" }

 sendCommand(Sonoff1,ON)</light>
Enjoy 🙂
