Introduction
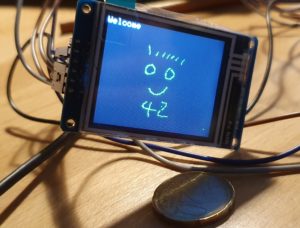
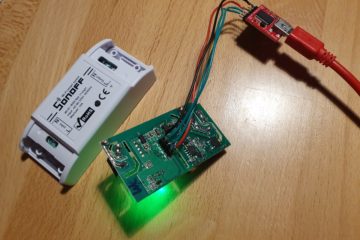
I am using a 1.8 Inch LCD Screen SPI Serial Port Module TFT Color Display Touch Screen ST7735 (128*160) for Arduino”, bought for 9€ from aliexpress.com.
Details: Display Processor: ST7735, Touch Processor: XPT2046, Display Type: ZJY180-TV2.0,128*160, as ESP8266 I am using the WEMOS D1 Mini Pro (v 2.0) https://wiki.wemos.cc/products:d1:d1_mini_pro.
Its part of my Project “BigPi” to use the PI4 as my central home server. I decided it needs a display.
Things should look nice..so what did I do?
Actually I got the Touchdisplay running at the RPI after a lot of tries – but what do I have on my desk: A big black RPI4 box with a touch-display. Not looking good.
My alternative: I build a tiny Touchdisplay with ESP8266 in a little box with battery, that I can place anywhere. I will communicate via WIFI to my RPI. No black box on the desk, just a cool multifunctional switch and status-display for RPI Remote control. Kind of a long running project – lets see how it goes.
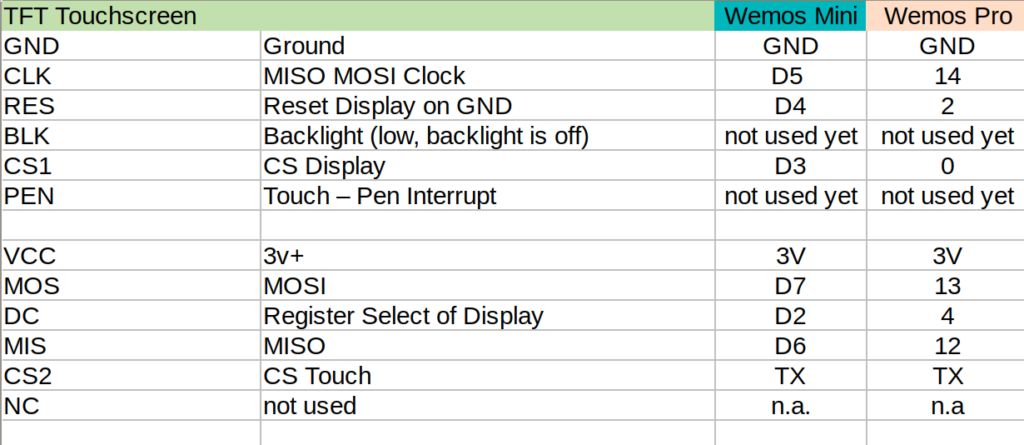
Wiring – how to get it together
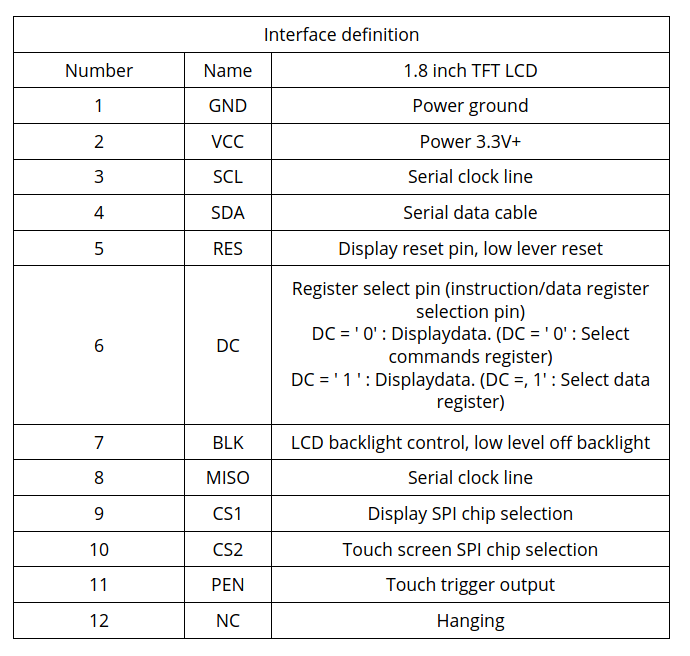
Of course, from china – there is not much documentation. Below some information I found at AliExpress about the display and all contacts at the display have labels. To note: PEN (11) is high, and gets low, when the display is touched – so can be directly linked to the Wemos (see below).
Some Details about the WEMOS D1 Mini Pro
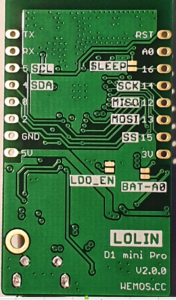
Understanding the Solder-Pads
This is a very nice ESP8266 processor, small size and including LiPo charger unit, so any 3.7V battery can be directly attached on it and can be charged via the mini USB. Its Pin-Compatible to the well known WEMOS Mini, that has some interesting soldering-pads on the back:
- SLEEP: This connect the Reset and the XPD_DCD – Deep Sleep Wakeup, so the WEMOS can waket-up itself from Deep-Sleep. For easy programming and the serial interface to work, this should not be connected. So do it, before you put it into production
- BAT-A0: Links the battery power to the analogue A0 input, so its possible to measure battery voltage (to detect low battery).
- LDO_EN: To disable the 5V regulator, so you can provide your own power source directly to the 3v3 and GND pins. Useful for battery operations. If you use standard lithium ion batteries that have 3.7-4.2V, it’s better to connect them to the 5V pin, since that is connected to an LDO converter.
Deep Sleep…tzzzzz…
I need “Deep Sleep” with ultra low power consumption, as it should run for a long time.
I measure current 0,15mA (150uA) out of the box for the WEMOS Pro Mini via the ESP.deepSleep(), with a 1200mAh LiPo it comes to 300 days.
If its running with display connected, but without backlight (BLK to GND), its consuming 0.48 mA (500uA) – what is approx 100 days runtime, 3 month is ok 🙂
When the display is active and backlight is on, it consumes around 20mA, when the display is off -it goes down to 1mA.
To Remember
During the Deep Sleep period GPIO_16 are held high. At the end of the Deep Sleep period GPIO_16 goes low, pulling down the Rest Pin (Reset Pin is low active, eventually add 1-10k resistor in between) and restarting the Wemos.
Prolem is, that when ESP8266 goes into DeepSleep, all IO are goint go High – so my display is “on”. It will need an inverter.
SPI – Confusion
SPI did confuse me, it has 3 lines MISO, MOSI and clock, the same I found on the touch-display. At the end I realized that it has 2 controllers, one for the touch sensor, and the other one for the display. Both are connected at the the same SPI bus and are selected based on chip select. So it somehow looks like below:
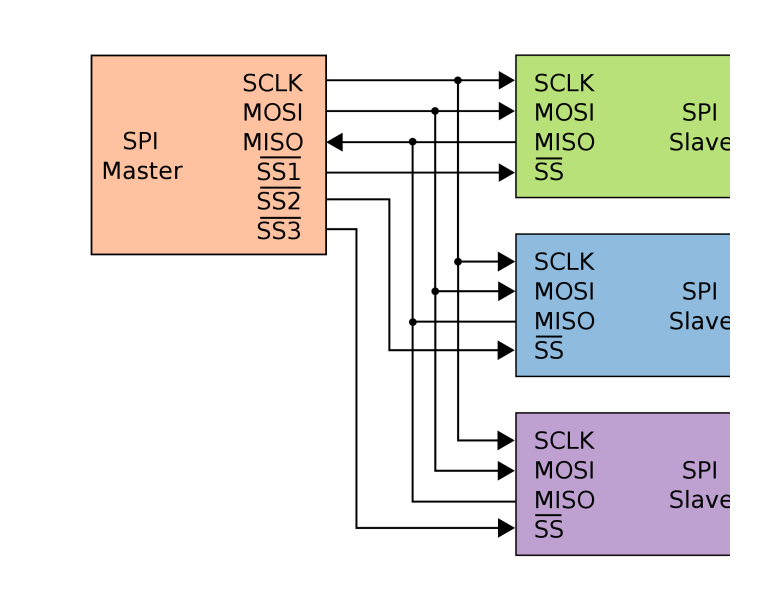
SPI Logic on the TFT/Touch Display
Software – How to get it running?
I am using CLION from JetBrains and Platformio for development -what I can really recommend to do. The following libraries support both controllers:
Adafruit ST7735 and ST7789 Library
Adafruit GFX Library
XPT2046_Touchscreen
Thanks to this great libraries, below makes you paint on the little display with a pen, just some lines of code.
void setup(void) {
tft.initR(INITR_GREENTAB); // initialize a ST7735S chip, CN: My-chip has a "green flag at the protection foil"
tft.setRotation(1);
tft.fillScreen(ST7735_BLACK);
ts.begin();
ts.setRotation(0);

delay(500);

tft.fillScreen(ST7735_BLACK);
testdrawtext("Welcome", ST7735_WHITE);
delay(1000);
tft.drawPixel(150, 118, ST7735_GREEN);

}

void loop() {

if (ts.touched()) {
TS_Point p = ts.getPoint();
tft.drawPixel(p.y * x_tft_scale, p.x*y_tft_scale, ST7735_GREEN);
}
delay(5);
}
Mission completed 🙂


3 Comments
Rene Schwyn · 17. April 2020 at 11:31
Where can i found the code for this example. Some Code is missing here?
cneuhaus · 20. April 2020 at 09:36
Hi Rene, thank you very much for your interest. I have made some progress – its now fully operational including a nice PCB and some more SW. I will update my page soon. SW is available here: https://github.com/happychriss/TouchSwitch
Smart, Power-Saving, Flexible – and now running for the first time! – 44-2.de · 7. May 2020 at 21:36
[…] already got the display running, check out this Post. But it consumes a lot of power when used, so it needs to SLEEP, when nobody is using the display. […]